
Operator's Manual


Under cer tain conditions, diesel fuel and
fuel v apor s ar e highl y flamma ble and
explosi v e. A fir e or explosion fr om fuel
can bur n y ou and other s and can cause
pr oper ty dama ge.
• Use a funnel and fill the fuel tank
outdoor s, in an open ar ea, when the
engine is of f and is cold. W ipe up an y
fuel that spills.
• Do not fill the fuel tank completel y
full. Add fuel to the fuel tank until the
lev el is 1/4 to 1/2 in. (6 to 13 mm)
belo w the bottom of the filler neck.
T his empty space in the tank allo ws
the fuel to expand.
• Nev er smok e when handling fuel,
and stay a w ay fr om an open flame or
wher e fuel fumes may be ignited by
a spar k.
• Stor e fuel in a clean, safety-appr o v ed
container and k eep the cap in place.
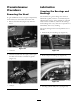
3. Open the air bleed screw on the fuel injection
pump ( Figure 37 ).
Figure 37
1. Fuel injection pump bleed screw
4. T ur n the k ey in the ignition switc h to the On
position. T he electric fuel pump will begin
operation, thereb y forcing air out around
the air bleed screw . Lea v e the k ey in the On
position for 15 seconds . Air and fuel will be
inter nally drained bac k to fuel tank. Tighten
the screw and tur n the k ey to Off .
Note: Nor mally the engine should star t after
the abo v e bleeding procedures are follo w ed.
Ho w ev er , if the engine does not star t, air
ma y be trapped betw een the injection pump
and injectors; refer to Bleeding Air from the
Injectors .
Bleeding Air from the
Injectors
Note: T his procedure should be used only if the
fuel system has been purg ed of air through nor mal
priming procedures and the engine will not star t;
refer to Bleeding the Fuel System.
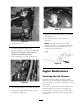
1. Loosen the pipe connection to the No . 1
injector nozzle and holder assembly at the
injection pump ( Figure 38 ).
Figure 38
1. No. 1 injector nozzle
2. Mo v e the throttle to the F ast position.
3. T ur n the k ey in the ignition switc h to the Star t
position and w atc h the fuel flo w around the
connector . T ur n the k ey to the Off position
when solid flo w is obser v ed.
4. Tighten the pipe connector securely .
5. R e peat the procedure on the remaining nozzles .
37