
Operator's Manual


cutting units to the floor . De press only the right
brak e pedal and eng ag e the parking brak e .
2. J ac k up left side of mac hine until left front tire
is off the shop floor . Suppor t mac hine with jac k
stands to prev ent it from falling accidentally .
3. Star t engine and allo w r un at lo w idle .
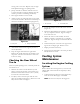
4. Adjust jam n uts on pump rod end to mo v e pump
control tube forw ard to eliminate forw ard cree p or
rearw ard to eliminate rearw ard cree p ( Figure 46 ).
Figure 46
1. Pump rod 2. Pump control tube
5. After wheel rotation ceases , tighten jam n uts to
secure adjustment.
6. Stop the engine and release the right brak e .
R emo v e jac k stands and lo w er the mac hine to the
shop floor . T est dri v e the mac hine to mak e sure
it does not cree p .
Checking the Rear Wheel
Toe-In
After ev er y 800 operating hours or ann ually , c hec k the
rear wheel toe-in.
1. Measure the center -to-center distance (at axle
height) at the front and rear of the steering tires .
T he front measurement m ust be 1/8 in. (3 mm)
less than the rear measurement.
2. T o adjust, remo v e the cotter pin and n ut from
either tie rod ball joint ( Figure 47 ). R emo v e tie rod
ball joint from axle case suppor t.
Figure 47
1. Tie rod clamp 2. Tie rod ball joint
3. Loosen the clamps at both ends of the tie rods
( Figure 47 ).
4. R otate the detac hed ball joint inw ard or outw ard
one (1) complete rev olution. Tighten clamp at
loose end of tie rod.
5. R otate the entire tie rod assembly the same
direction (inw ard or outw ard) one (1) complete
rev olution. Tighten clamp at connected end of tie
rod.
6. Install the ball joint in the axle case suppor t and
tighten the n ut fing er tight. Measure toe-in.
7. R e peat procedure if necessar y .
8. Tighten the n ut and install a new cotter pin when
the adjustment is cor rect.
Cooling System
Maintenance
Servicing the Engine Cooling
System
R emo v e debris from the engine area, oil cooler and
radiator daily . Clean them more frequently in dir ty
conditions .
1. Unlatc h and swing open rear screen ( Figure 48 ).
Clean the screen thoroughly of all debris .
Note: T o remo v e screen, lift off hing e pins .
41