
Operator's Manual


3
InstallingtheCEDecals
Partsneededforthisprocedure:
1
Warningdecal(104-5181)
1
Warningdecal(99-3558)
3
Warningdecal(107-1972)
Procedure
IfthismachinewillbeusedforCE,afxthe
CE-warningdecalsoverthecorrespondingEnglish
warningdecals.
4
InstallingtheHoodLatch
CEOnly
Partsneededforthisprocedure:
1Lockbracket
2Rivet
1Washer
1
Screw(1/4x2inches)
1
Locknut(1/4inch)
Procedure
1.Unhookthehoodlatchfromthehood-latch
bracket.
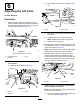
2.Removethe2rivetssecuringthehood-latch
brackettothehood(Figure6).
g031570
Figure6
1.Rivets2.Hood-latchbracket
3.Removethehood-latchbracketfromthehood.
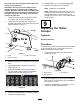
4.Whilealigningthemountingholes,positionthe
lockbracketandthehood-latchbracketontothe
hood(Figure7).
Note:Thelockbracketmustbeagainstthe
hood.
Note:Donotremovetheboltandnutfromthe
lock-bracketarm.
g012629
Figure7
1.Lockbracket2.Boltandnut
5.Alignthewasherswiththeholesontheinsideof
thehood.
6.Rivetthebracketsandthewasherstothehood
(Figure7).
7.Hookthelatchontothehood-latchbracket
(Figure8).
15