
Service Manual


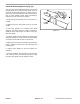


Push Arm and Torsion Spring Service (Fig. 18, 19, 20, 21, 22, 23, 24)
Removing Push Arms,
Torsion Springs and Bushings
1. Separate cutting unit from traction unit and roll cutting
unit away from traction unit.
2. Have a helper push down on the left push arm while
you put a 4" x 4" block of wood between the chassis and
the top of the push arm, and across the full width of the
machine.
3. Loosen the large jam nut on the left-hand ball joint at
th
e end of the push arm. Remove the ball joint (mount
attached) from the push arm.
Figure 18
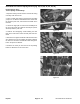
4. Remove the self-tapping screws holding the floor
plate to the main frame. Raise the floor plate and set it
aside.
5. Disconnect the right-hand brake cable from the brake
str
ut. Remove the jam nut holding the brake cabled in
the mount on the frame and slide the cable through the
hole in the push arm bracket.
6. Remove the cotter pin from the end of the parking
br
ake rod. Slide the rod out of the latch.
Figure 19
Figure 20
Repairs Page 13 - 14 Groundsmaster
®
300 Series