
Service Manual


14. Remove the ring ridge from each cylinder using a
ridge removing tool. This will prevent damage to the
rings and pistons. Remove the connecting rod cap nuts
and then remove the bearing caps. Place these parts in
cylinder number order. Remove the pistons and con-
necting rods by pushing them up from the bottom of the
block. Use a wooden block to push the pistons and rods
to avoid damage to the connecting rod.
NOTE: Before removing the pistons scribe the number
of th
e cylinder onto the top of the piston. When the piston
and rod assembly is removed, use care to prevent
damage to the piston or bearing surfaces.
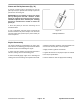
15. Remove the main bearing caps. Arrange the re-
move
d caps and bearings according to cylinder order
so they may be replaced in the same position upon
reassembly.
NOTE: Before removing the main bearing caps, meas-
ur
e the crankshaft end play.
16. Remove the crankshaft after removing the main
bearing caps.
17. Remove the crankshaft oil seal and gasket.
18. Check the cylinder block for cracks or damage.
Rep
lace the cylinder block if it is unserviceable.
Figure 64
Main bearing caps
Cylinder Block Overhaul Page 4 - 54 Groundsmaster
®
300 Series