
Operator's Manual


SharpeningtheBlades
1.Usealetosharpenthecuttingedgeatbothends
oftheblade(Figure57).Maintaintheoriginalangle.
Thebladeretainsitsbalanceifthesameamountof
materialisremovedfrombothcuttingedges.
Figure57
1.Sharpenatoriginalangle
2.Checkthebalanceofthebladebyputtingitona
bladebalancer(Figure58).Ifthebladestaysina
horizontalposition,thebladeisbalancedandcanbe
used.Ifthebladeisnotbalanced,lesomemetaloff
theendofthesailareaonly(
Figure58).Repeatthis
procedureuntilthebladeisbalanced.
Figure58
1.Blade2.Balancer
InstallingtheBlades
1.Installthecurvedwasherandthenthebladeonto
thebolt.Selectthepropernumberofspacer(s)for
theheight-of-cut,andslidetheboltintothespindle
(Figure56).
Important:Thecurvedpartoftheblademust
pointupwardtowardtheinsideofthemowerto
ensurepropercutting.
2.Installtheremainingspacer(s)andsecurethemwith
athinwasherandanut(
Figure56).
3.Torquethebladeboltto75-80ft-lb(101-108N-m).
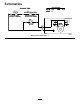
AdjustingtheBladeBrake
1.DisengagethePTO,turntheignitionkeytooff,and
removethekey.
2.Waitforallmovingpartstostopbeforeleavingthe
operatingpositionandthensettheparkingbrakes.
3.Ifnecessary,adjustthespringmountingboltssothat
thebladebrakepadrubsagainstbothsidesofthe
pulleygroove(
Figure59).
4.Adjustthenutattheendofthebladebrakeroduntil
thereis1/8-3/16inch(3mm-5mm)betweenthe
nutandspacer(Figure59).
5.Engagetheblades.Ensurethebladebrakepadno
longercontactsthepulleygroove.
Figure59
1.Springmountingbolts3.1/8-3/16inch(3mm-5mm)
2.Bladebrakepad
ReplacingtheGrassDeector
WARNING
Anuncovereddischargeopeningcouldallowthe
lawnmowertothrowobjectsintheoperator’sor
bystander’sdirectionandresultinseriousinjuryor
death.Also,contactwiththebladecouldoccur.
Neveroperatethelawnmowerwiththegrass
deectorremovedunlessyouinstallacoverplate,a
mulchplate,oragrasschuteandcatcher.
1.Removethelocknut,bolt,springandspacerholding
thedeectortothepivotbrackets(
Figure60).
Removedamagedorworngrassdeector.
41