
Operator's Manual
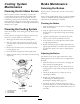


4.Adjustthenutattheendofthebladebrakeroduntil
thereis1/8-3/16inch(3mm-5mm)betweenthe
nutandspacer(Figure58).
5.Engagetheblades.Ensurethebladebrakepadno
longercontactsthepulleygroove.
Figure58
1.Springmountingbolts3.1/8-3/16inch(3mm-5mm)
2.Bladebrakepad
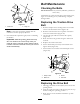
ReplacingtheGrassDeector
WARNING
Anuncovereddischargeopeningcouldallowthe
lawnmowertothrowobjectsintheoperator’sor
bystander’sdirectionandresultinseriousinjuryor
death.Also,contactwiththebladecouldoccur.
Neveroperatethelawnmowerwiththegrass
deectorremovedunlessyouinstallacoverplate,a
mulchplate,oragrasschuteandcatcher.
1.Removethelocknut,bolt,springandspacerholding
thedeectortothepivotbrackets(
Figure59).
Removedamagedorworngrassdeector.
Figure59
1.Bolt
5.Springinstalled
2.Spacer6.GrassDeector
3.Locknut
7.Lendofspring,place
behinddeckedgebefore
installingbolt
4.Spring8.Jhookendofspring
2.Placespacerandspringontograssdeector.Place
theLendofspringbehinddeckedge.
Note:MakesuretheLendofspringisinstalled
behinddeckedgebeforeinstallingtheboltasshown
in
Figure59.
3.Installboltandnut.PlacetheJhookendofspring
aroundgrassdeector(Figure59).
Important:Thegrassdeectormustbefree
torotate.Liftthedeectoruptothefullopen
positionandensurethatitrotatesfreelywithout
bindingintothefulldownposition.
40