
Operator's Manual


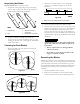


Table Of Contents
- NO TITLE
- NO TITLE
- NO TITLE
- NO TITLE
- Adding Fuel
- Think Safety First
- Operating the Parking Brake and Neutral Locks
- Starting and Stopping the Engine
- Operating the Blade Control (PTO) Lever
- The Safety Interlock System
- Driving Forward or Backward
- Stopping the Mower
- Transporting Machines
- Side Discharging or Mulching the Grass
- Adjusting the Wheel Drive Tension
- Adjusting the Height-of-Cut
- Adjusting the Flow Baffle
- Positioning the Flow Baffle
- Adjusting the Handle Height
- Height of Cut Chart
- How to Grease
- Lubricating the Caster and Wheel Bearings
- Greasing the Transmission Couplers
- Greasing the Mower Belt Idler
- Servicing the Air Cleaner
- Servicing the Engine Oil
- Servicing the Spark Plugs
- Servicing the Fuel System
- Checking the Tire Pressure
- Cleaning the Air Intake Screen
- Cleaning the Cooling System
- Servicing the Brakes
- Checking the Belts
- Replacing the Traction Drive Belt
- Replacing the Drive Belt
- Replacing the Mower Belt
- Adjusting the Mower Belt Tension
- Adjusting the Control Rods
- Mower Deck Maintenance
- NO TITLE

AdjustingthePTOEngagement
Linkage
ThePTOengagementlinkageadjustmentislocatedbeneath
thefrontlefthandcorneroftheenginedeck.
1.Disengagethebladecontrol(PTO)leverandsetthe
parkingbrakes.
2.Stoptheengineandwaitforallmovingpartstostop
beforeleavingtheoperatingposition.
3.Engagethebladecontrollever(PTO).
4.Adjustthelinkagelengthtowherethelowerendofthe
bellcrankjustclearstheaxlesupportgusset(Figure47).
Figure47
1.Bellcrank4.Yoke
2.Safetyswitchlocated
underenginedeck
5.Nut
3.Bellcrankjustclearsthe
gussetwiththePTO
engaged
6.Assistarmlink
5.Makesuretheassistarmisagainsttherearassistarm
stoponthedeck(Figure48).
6.Pushthebladecontrollever(PTO)downtothe
disengagedposition.
7.Theassistarmshouldcontactthefrontassistarmstop
onthedeck.Ifitdoesnotcontact,adjustthebellcrank
soitisclosertothegusset(Figure48).
Figure48
1.Yoke5.Assistarmlink
2.Nut6.Assistarm
3.Rearassistarmstop7.Turnbuckle
4.Frontassistarmstop
8.Toadjusttheassistarmlink,removethehairpincotter
pinfromtheassistarm(Figure48).
9.Loosenthenutagainsttheyoke(Figure47).
10.Removetheassistarmlinkfromtheassistarmand
rotatethelinktoadjustthelength.
11.Installtheassistarmlinkintotheassistarmandsecure
itwiththehairpincotterpin(Figure48).
12.Checkiftheassistarmhitsagainstthestopscorrectly.
AdjustingthePTOSafetySwitch
1.Disengagethebladecontrol(PTO)leverandsetthe
parkingbrakes.
2.Stoptheengineandwaitforallmovingpartstostop
beforeleavingtheoperatingposition.
3.Disengagethebladecontrollever(PTO).Makesure
theassistarmisagainstthefrontassiststoparm.
4.Ifneeded,adjustthebladesafetyswitchbyloosening
theboltsholdingtheswitchbracket(Figure49).
5.Movethemountingbracketuntilthebellcrank
depressestheplungerbya6mm(1/4inch).
6.
Note:Makesurethebellcrankdoesnottouchthe
switchbodyordamagetotheswitchcouldoccur
(Figure49).
Tightentheswitchmountingbracket.
35