
Operator's Manual


24
Type: Champion RC 12YC (or equivalent)
Air Gap: 0.040 in. (1 mm)
Removing the Spark Plugs
1. Disengage the power take off (PTO), set the parking
brake, and turn the ignition key to off. Remove the
key.
2. Raise seat and remove belt guard. See Removing Belt
Guard on page 21.
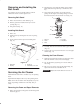
3. To gain access to the rear spark plug the gas tank must
be removed (Fig. 20).
Danger
In certain conditions, gasoline is extremely
flammable and highly explosive. A fire or
explosion from gasoline can burn you and others
and can damage property.
• Drain gasoline from the fuel tank when the
engine is cold. Do this outdoors in an open area.
Wipe up any gasoline that spills.
• Never smoke when draining gasoline, and stay
away from an open flame or where a spark may
ignite the gasoline fumes.
4. Rotate tank and set in hood to prevent fuel spilling.
5. Push out plastic cover from access hole in plate
between engine and gas tank.
6. Pull the wire(s) off the spark plug(s). Now clean
around the spark plug(s) to prevent dirt from falling
into the engine and potentially causing damage.
7. Remove the spark plug(s) and metal washer.
M–4286
1
2
Figure 20
1. Fuel tank 2. Opening for access
Checking the Spark Plug
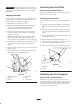
1. Look at the center of the spark plug(s) (Fig. 21). If you
see light brown or gray on the insulator, the engine is
operating properly. A black coating on the insulator
usually means the air cleaner is dirty.
Important Never clean the spark plug(s). Always
replace the spark plug(s) when it has: a black coating,
worn electrodes, an oily film, or cracks.
2. Check the gap between the center and side electrodes
(Fig. 21). Bend the side electrode (Fig. 21) if the gap is
not correct.
1 mm
(0.040 in.)
2
3
1
Figure 21
1. Center electrode insulator
2. Side electrode
3. Air gap (not to scale)
Installing the Spark Plug(s)
1. Install the spark plug(s) and metal washer. Make sure
the air gap is set correctly.
2. Tighten the spark plug(s) to 17 N m (12 ft. lb).
3. Push the wire(s) onto the spark plug(s) (Fig. 20).
4. Push plastic cover into access hole in plate between
engine and gas tank.
5. Lift fuel tank and attach fuel hose, secure with hose
clamp.
6. Rotate fuel tank into position, hook straps into lower
bracket and secure with capscrews and lock nuts.
7. Reinstall belt guard. See Installing Belt Guard on
page 21.
Greasing and Lubrication
Service Interval/Specification
Grease all bearings and bushings every 25 operating
hours. Grease more frequently (daily) when operating
conditions are extremely dusty or sandy.