
Service Manual


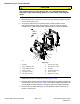


Disassembly(Figure131)(continued)
4.Graspendofrodanduseatwistingandpullingmotiontocarefullyextract
rod,pistonandheadassemblyfromcylinderbarrel.
IMPORTANT
Donotclampvisejawsagainstrodsurface;therodwillbedamaged.
5.Securelymountrod,pistonandheadassemblyintovisewithsoftjaws.
6.Removelocknutandthenpistonfromtherod.Slideheadandtheninternal
collarofftherod.
7.RemoveanddiscardallsealsandO−ringsfromthepistonandthehead.
CAUTION
Useeyeprotectionsuchasgoggleswhenusingcompressedairto
drycylindercomponents.
8.Washcylinderpartsincleansolvent.Drypartswithcompressedair.Do
notwipepartsdrywithpapertowelsorcloth.Lintinahydraulicsystemwill
causedamage.
9.Carefullyinspectinternalsurfaceofbarrelfordamage(deepscratches,
out−of−round,etc.).Inspectrodandpistonforevidenceofexcessivescoring,
pittingorwear.Replacesteeringcylinderifinternalcomponentsareworn
ordamaged.
Assembly(Figure131)
1.Useacompleterepairkitwhenrebuildingthesteeringcylinder.Putacoating
ofcleanhydraulicoilonallnewsealsandO−rings.
2.InstallnewlubricatedO−ringsandsealstothepistonandhead.
IMPORTANT
Donotclampvisejawsagainsttherodsurface.
3.Mountrodsecurelyinavisebyclampingontheclevisoftherod.
4.Lubricaterodwithcleanhydraulicoil.Carefullyslideinternalcollar,head
andthenpistonontotherod.
5.Installandtightenlocknutontorod.T orquelocknut54N·m(40ft−lb).
6.Removerodassemblyfromvise.
7.Putacoatingofcleanhydraulicoilonallcylinderpartstoeaseassembly.
8.Carefullysliderodassemblyintocylinderbarrel.
IMPORTANT
Preventdamagewhenclampingthecylinderinavise,clamponthe
clevisonly.Useofavisewithsoftjawsisrecommended.
Groundsmaster
®
4100-D&4110-D
Page5–141
HydraulicSystem:ServiceandRepairs
13203SLRevF