
Service Manual


Removal(Figure343)(continued)
CAUTION
Becarefulwhenremovingidlerspring.Thespringisunderheavy
loadandmaycausepersonalinjury.
3.Usespringhooktooltounhooktheidlerspring(item15)fromtheadjusting
screw(item4).
4.Removedrivebelt(s)fromdeckpulleys.
5.Loosenangenuts(item11)thatsecureidlerstopbolt(item10)tocutting
decktoallowclearancebetweenidlerarmandstopbolt.
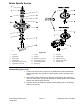
6.RemoveidlercomponentsasneededusingFigure20Figure343asaguide.
Notelocationofwashers,idlerspacerandscrewasidlerassembliesare
beingremoved.
Installation(Figure343)
(3.250 to 3.750 in)
82.6 to 95.2 mm
(0.125 to 0.185 in)
3.2 to 4.6 mm
g305134
Figure344
1.InstallremovedidlercomponentsusingFigure343asaguide.
A.Makesurethatone(1)thrustwasher(item19)isplacedbelowtheidler
armandthree(3)thrustwashersareplacedbetweentheidlerand
retainingringlocation.
B.Secureidlerarmassemblytocuttingdeckwithretainingring.
C.Ifidlerstopbolt(item10)wasremovedfromdeck,makesurethatitis
installedintheholethatallowsthestopboltheadtoalignwiththeidler
arm.
2.Installdrivebelttopulleys.
3.Usespringhooktooltoattachtheidlerspring(item15)ontotheadjusting
screw(item4)andshoulderboltonidlerarm.Withtheidlerarmtensioning
thedrivebelt,thespringhooktohooklengthshouldbefrom82.6to95.2
mm(3.250to3.750in)(Figure344).Ifnecessary,disconnectspringand
changepositionofadjustingscrew.Whenidlerspringisthecorrectlength,
tightensecondangenuttosecureadjustment.
4.Adjustlocationofidlerstopbolt(item10)sothattheclearancebetween
idlerarmandidlerstopboltheadisfrom3.2to4.6mm(0.125to0.185
in)(Figure344).
5.Lubricateidlerarmgreasetting.
6.Installdeckcoverstocuttingdeck.
CuttingDecks:ServiceandRepairs
Page9–22
Groundsmaster
®
4100-D&4110-D
13203SLRevF