
Service Manual


Removal(Figure94andFigure95)(continued)
2.Raiseandsupportmachinetogainaccesstogearpumpfromtheunderside
ofthemachine.
3.Drainthehydraulicreservoir.
IMPORTANT
Followalllocalcodesandregulationswhenrecyclingordisposing
hydraulicuid.
4.Topreventcontaminationofhydraulicsystemduringremoval,thoroughly
cleanexteriorofpumpandttings.
5.ReadtheGeneralPrecautionsforRemovingandInstallingHydraulicSystem
Components(page5–83).
6.Disconnecthydrauliclinesfromgearpumpandputcapsorplugsonopen
hydrauliclinesandttings.Labeldisconnectedhydrauliclinesforproper
installation.
IMPORTANT
Dryweightofgearpumpis10.2kg(23lbs).
7.Supportgearpumpassemblytopreventitfromfalling.
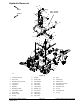
Remove plugs before installing
gear pump to piston pump
2
1
g275422
Figure96
1.Pistonpumpcasedrain
2.Gearpumpsuctionport
8.Removetwo(2)capscrewsandwasherssecuringgearpumptopiston
pump.Lowerandremovegearpumpfrommachine.
Note:Acasedrainexistsinthepiston(traction)pumpandasuctionportis
neartheinputshaftofthegearpump(Figure96).Whenthegearpumpis
removedfromthepistonpump,plugpistonpumpcasedrainholetoprevent
drainingthepistonpump.
9.RemoveO−ring(item11)frombetweenthegearpumpandpistonpump.
DiscardO−ring.
10.Ifhydraulicttingsaretoberemovedfromgearpump,markttingorientation
toallowcorrectassembly.RemovettingsfrompumpanddiscardO−rings.
Groundsmaster
®
4000-D&4010-D
Page5–99
HydraulicSystem:ServiceandRepairs
13202SLRevF