
Service Manual


Groundsmaster 360Operator Cab Page 8 − 4
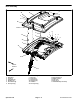
Air Conditioning Compressor
Figure 1
FRONT
RIGHT
1. A/C compressor mount bracket
2. Flange nut (4)
3. Air conditioning compressor
4. Flange nut
5. Pulley
6. Cap screw (3)
7. Idler pulley
8. Carriage screw
9. Spacer
10. Cap screw (2)
11. Lock nut (2)
12. Screw (4)
13. V−belt
14. Reservoir bracket
15. Windshield washer reservoir
16. A/C hose (from evaporator)
17. A/C hose (to condenser)
9
7
4
5
1
3
11
10
8
6
2
13
12
14
2
15
16
17
24 to 29 ft−lbs
(33 to 39 N−m)
26 to 31 ft−lb
(36 to 42 N−m)
Removal (Fig. 1)
1. Park machine on a level surface, lower cutting deck,
stop engine, engage parking brake and remove key
from the ignition switch.
2. Raise hood to allow access to engine.
3. Loosen flange nut that secures idler pulley. Move
pulley to loosen A/C compressor drive belt. Remove
drive belt from A/C compressor pulley.
4. Inspect compressor drive belt for glazing or damage.
Replace belt if necessary.
5. Disconnect compressor electrical connector from
machine wire harness.
6. Read the General Precautions for Removing and
Installing Air Conditioning System Components at the
beginning of the Service and Repairs section of this
chapter.