
Operator's Manual


1
G001469
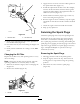
Figure28
1.Spark-plugwire/sparkplug
4.Cleanaroundthesparkplugstopreventdirtfrom
fallingintotheengineandpotentiallycausing
damage.
5.Removethesparkplugsandthemetalwashers.
CheckingtheSparkPlugs
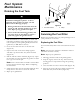
1.Lookatthecenterofthesparkplugs(Figure29).
Ifyouseelightbrownorgrayontheinsulator,the
engineisoperatingproperly.Ablackcoatingonthe
insulatorusuallymeansthattheaircleanerisdirty.
2.Ifneeded,cleanthesparkplugwithawirebrushto
removecarbondeposits.
0.030 inch
(0.75 mm)
1
2
3
G001470
Figure29
1.Centerelectrodeinsulator3.Airgap(nottoscale)
2.Sideelectrode
Important:Alwaysreplacethesparkplugs
whenithaswornelectrodes,anoilylmonit,
orhascracksintheporcelain.
3.Checkthegapbetweenthecenterandsideelectrodes
(Figure29).Bendthesideelectrode(Figure29)if
thegapisnotcorrect.
InstallingtheSparkPlugs
1.Installthesparkplugsandthemetalwasher.Ensure
thattheairgapissetcorrectly.
2.Tightenthesparkplugsto16ft-lb(22N-m).
3.Connectthewirestothesparkplugs(Figure29).
28