
Operator's Manual


tractionpedalinneutral,putthePTOleverin
theOffposition,stoptheengine,andremovethe
ignitionkey.
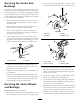
2.Examinethecuttingendsofthebladecarefully,
especiallywheretheatandcurvedpartsofthe
blademeet(
Figure88).Sincesandandabrasive
materialcanwearawaythemetalthatconnects
theatandcurvedpartsoftheblade,checkthe
bladebeforeusingthemower.Ifwearisnoticed
(
Figure88),replacetheblade.
Figure88
1.CuttingEdge3.Wear/slotForming
2.CurvedArea4.Crack
3.Examinethecuttingedgesofalloftheblades.
Sharpenthecuttingedgesiftheyaredullornicked.
Sharpenonlythetopofthecuttingedgeand
maintaintheoriginalcuttingangletomakesure
ofsharpness(Figure89).Thebladewillremain
balancedifthesameamountofmetalisremoved
frombothcuttingedges.
DANGER
Ifthebladeisallowedtowear,aslotwillform
betweenthesailandatpartoftheblade.
Eventuallyapieceoftheblademaybreakoff
andbethrownfromunderthehousing,possibly
resultinginseriousinjurytoyouorbystanders.
•Inspectthebladeperiodicallyforwearor
damage.
•Nevertrytostraightenabladethatisbentor
weldabrokenorcrackedblade.
•Replaceawornordamagedblade.
Figure89
1.Sharpenatoriginalangle
Note:Removethebladesandsharpenthemona
grinder.Aftersharpeningthecuttingedges,install
thebladewiththeanti-scalpcupandbladebolt;refer
toRemovingandInstallingtheCutterBlade(s).
CorrectingCuttingUnit
Mismatch
Ifthereismismatchbetweentheblades,onasingle
cuttingunit,thegrasswillappearstreakedwhenitiscut.
Thisproblemcanbecorrectedbymakingsurethatthe
bladesarestraightandallofthebladesarecuttingon
thesameplane.
1.Usinga3foot(1meter)longcarpenterslevel,nd
alevelsurfaceontheshopoor.
2.Raisetheheight-of-cuttothehighestposition;refer
toAdjustingtheHeight-Of-Cut.
3.Lowerthecuttingunitontotheatsurface.Remove
thecoversfromthetopofthecuttingunit.
4.Loosentheangenutsecuringtheidlerpulleyto
releasethebelttension.
5.Rotatethebladesuntiltheendsfaceforwardand
backward.Measurefromtheoortothefronttipof
thecuttingedge.Rememberthisdimension.Then
rotatethesamebladesothattheoppositeendis
55