
Operator's Manual


43
1
3
4
2
5
m–5199
6
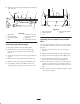
Figure 59
1. Sail Area of Blade
2. Blade
3. Blade spindle
4. Washer
5. Blade bolt
6. Lock washer
Sharpening the Blades
1. Use a file to sharpen the cutting edge at both ends of
the blade (Fig. 60). Maintain the original angle. The
blade retains its balance if the same amount of
material is removed from both cutting edges.
1
m–1854
Figure 60
1. Sharpen at original angle
2. Check the balance of the blade by putting it on a blade
balancer (Fig. 61). If the blade stays in a horizontal
position, the blade is balanced and can be used. If the
blade is not balanced, file some metal off the end of
the sail area only (Fig. 59). Repeat this procedure
until the blade is balanced.
1
2
m–1855
Figure 61
1. Blade 2. Balancer
Installing the Blades
1. Install the blade onto the spindle shaft (Fig. 59).
Important The sail part of the blade must be pointing
upward, toward the inside of the mower to ensure proper
cutting (Fig. 59).
2. Install the lock washer and blade bolt (Fig. 59).
Torque the blade bolt to 85–110 ft-lb (115–140 Nm).
Correcting the Mower Quality
of Cut
If one deck blade cuts lower than the other, correct as
follows.
Note: Tire air pressure is critical in these procedures.
Make sure all tires have correct pressure.
1. Disengage the PTO and set the parking brake.
2. Stop the engine, remove the key, and wait for all
moving parts to stop before leaving the operating
position.
3. Adjust the tire pressure in all tires to specifications on
page 32.
4. Check that the blades and spindle shafts are not bent.
Refer to Checking for Bent Blades on page 42.
5. Set the height-of-cut to the 4 inch (101.6 mm)
position. Refer to Adjusting the Height-Of-Cut in the
Operation section.
6. Perform steps in the following sections Frame Set Up,
Checking Front–to–Rear Pitch and Checking
Side–to–Side Leveling.
Frame Set Up
Checking Carrier Frame and Deck
Alignment
1. Disengage the PTO and set the parking brake.
2. Stop the engine, remove the key, and wait for all
moving parts to stop before leaving the operating
position.
3. Place a long straight edge on top of the engine deck as
shown in figure 62.
4. At the carrier frame cross tube, measure location A
height (Fig. 62). This measurement must be
1–5/16 inch (33 mm), plus or minus a 1/4 inch (6 mm).
5. If the height at location A is not correct, adjustment is
needed.
6. Loosen the carrier frame mounting bolts on both sides
of the machine (Fig. 62).
7. Align the carrier frame and engine deck to match
1–5/16 inch (33 mm), plus or minus a 1/4 inch (6 mm)
at location A (Fig. 62).