
Operator's Manual


32
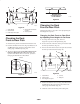
Important With the parking brake released, the rear
wheels must rotate freely when you push the mower. If
brake action and free wheel rotation cannot be achieved
contact your service dealer immediately.
m–6596
5
3
6
1 2
8
7
4
Figure 37
1. Hairpin cotter
2. Washer
3. Trunnion
4. Bell crank
5.
6. Hole for brake rod
7. Initial adjustment—
1–1/4 inch (32 mm)
8. Rod
Servicing the Cutting Blades
To ensure a superior quality of cut, keep the blades sharp.
For convenient sharpening and replacement, you may want
to keep extra blades on hand.
A worn or damaged blade can break, and a piece
of the blade could be thrown into the operator’s or
bystander’s area, resulting in serious personal
injury or death.
• Inspect the blade periodically for wear or
damage.
• Replace a worn or damaged blade.
Warning
Before Inspecting or Servicing the Blades
Park the machine on a level surface, disengage the blade
control (PTO) and set the parking brake. Turn the ignition
key to off. Remove the key and disconnect the spark plug
wire(s) from the spark plug(s).
Inspecting the Blades
1. Inspect the cutting edges (Fig 38). If the edges are not
sharp or have nicks, remove and sharpen the blades.
Refer to Sharpening the Blades on page 33.
2. Inspect the blades, especially the curved area (Fig. 38).
If you notice any damage, wear, or a slot forming in this
area (item 3 in Fig. 38), immediately install a new
blade.
1
2
3
m–151
Figure 38
1. Cutting Edge
2. Curved Area
3. Wear/slot Forming
Checking for Bent Blades
1. Rotate the blades until the ends face forward and
backward (Fig. 39). Measure from a level surface to the
cutting edge, position A, of the blades (Fig. 40). Note
this dimension.