
Service Manual


CHASSIS
4 - 6 Mid-Size Walk Behind Service Manual
Adjusting the Brake
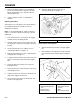
The brake handle is on the left side of the machine
(Figure 33). If the parking brake does not hold
securely, and adjustment is required.
1. Check the brake before you adjust it; refer to
”Checking the Brake" on page 4 - 5.
2. Release the parking brake; refer to ”Releasing the
Parking Brake" on page 4 - 4.
3. Loosen the top and bottom jam nuts (Figure 33).
4. To adjust the brake, remove the hair pin cotter and
clevis pin from the lower brake lever (Figure 33).
5. Rotate the brake rod in the yokes. To tighten the
brake, lengthen the rod between the yokes. To
loosen the brake, shorten the rod between the
yokes (Figure 33).
Note: The brake rod should be threaded into both
yokes the same distance.
6. Secure the yoke to lower brake lever with the hair
pin cotter and clevis pin (Figure 33).
7. Tighten the top and bottom jam nuts (Figure 33).
8. Check the brake operation again, refer to
”Checking the Brake" on page 4 - 5.
Figure 33
m-6614
T-Bar - Gear Drive - Fixed Deck
Checking the Brake
1. Park the machine on a level surface, disengage
the blade control (PTO) and set the parking brake.
2. Rear wheels must lock when you try to push the
machine forward or backward. Adjustment is
required if the wheels turn and do not lock; refer to
”Adjusting the Brake" on page 4 - 7.
3. Release the brake and press the upper control bar
very lightly, approximately 1/2 inch (13mm),
wheels should rotate freely.
4. If both conditions are met, no adjustment is
required.
(1) Yoke
(2) Parking brake lever
(released position)
(3) Clevis pin
(4) Hair pin cotter
(5) Jam nut
(6) Brake rod
(7) Lower brake lever
(8) 1 o’clock position