
Operator's Manual


The Safety Interlock System
If safety inter lock s witches ar e disconnected
or dama ged the machine could operate
unexpectedl y causing per sonal injur y .
• Do not tamper with the inter lock
s witches.
• Check the operation of the inter lock
s witches dail y and r eplace an y dama ged
s witches bef or e operating the machine.
Understanding the Safety Interlock
System
T he safety interloc k system is designed to prev ent
the mo w er blades from rotating unless:
• T he control bail is de pressed.
• T he po w er tak e off switc h (PTO) is pulled on .
T he safety interloc k system is designed to
stop the mo w er blades if y ou release the blade
control bail.
Testing the Safety Interlock System
T est the safety interloc k system before y ou use the
mac hine eac h time .
Note: If the safety system does not operate
as described belo w , ha v e an A uthorized Ser vice
Dealer re pair the safety system immediately .
1. Set the parking brak e and star t the engine;
refer to Star ting and Stopping the Engine in
Operation , pag e 19 .
2. Squeeze the blade control bail ag ainst upper
control bar . T he blades should not r otate.
3. T hen contin ue holding the blade control bail
and pull up on the blade control switc h and
release . T he clutc h should eng ag e and the
mo w er blades begin rotating .
4. R elease the blade control bail. T he blades
should stop r otating .
5. With the engine r unning, pull up the po w er
tak e off switc h (PTO) and release without
holding the blade control bail. T he blades
should not r otate.
Driving Forward or
Backward
T he throttle control regulates the engine speed as
measured in RPM (rev olutions per min ute). Place
the throttle control in the f ast position for best
mo wing perfor mance .
Driving Forward
1. T o g o forw ard, mo v e the shift lev er to a
forw ard g ear ( Figure 21 ).
2. R elease the parking brak e; refer to R eleasing
the P arking Brak e in Brak e Maintenance ,
pag e 36 .
3. Slo wly press on the upper control bar to mo v e
forw ard ( Figure 21 ).
T o g o straight, apply equal pressure to both
ends of the upper control bar ( Figure 21 ).
T o tur n, release pressure on the upper control
bar side in the direction y ou w ant to tur n
( Figure 21 ).
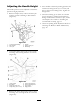
Figure 21
1. Upper control bar 3. Shift lever
2. Lower control bar
Driving Backward
1. T o g o bac kw ard, mo v e the shift lev er to rev erse
g ear .
2. R elease the parking brak e; refer to R eleasing
the P arking Brak e in Operation , pag e 19 .
3. Slo wly squeeze the lo w er control bar and lo w er
handle tog ether to mo v e rearw ard ( Figure 21 ).
22