
Operator's Manual


31
3
2
1
m–5234
3
1
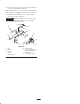
Figure 38
1. Hose clamp
2. Fuel line
3. Filter
Cutting Blade Service
To ensure a superior quality of cut, keep the blades
sharp. For convenient sharpening and replacement,
you may want to keep extra blades on hand.
A worn or damaged blade can break, and a piece
of the blade could be thrown into the operator’s
or bystander’s area, resulting in serious personal
injury or death.
• Inspect the blade periodically for wear or
damage.
• Replace a worn or damaged blade.
Warning
Before Inspecting or Servicing the
Blades
Park the machine on a level surface, disengage the blade
control (PTO) and set the parking brake. Turn the ignition
key to “OFF” to stop the engine. Remove the key and
disconnect the spark plug wire(s) from the spark plug(s).
Inspecting the Blades
1. Inspect the cutting edges (Fig 39). If the edges are not
sharp or have nicks, remove and sharpen the blades.
Refer to Sharpening the Blades on page 32.
2. Inspect the blades, especially the curved area (Fig. 39).
If you notice any damage, wear, or a slot forming in
this area (item 3 in Fig. 39), immediately install a new
blade.
1
2
3
m–151
Figure 39
1. Cutting Edge
2. Curved Area
3. Wear/slot Forming
Checking for Bent Blades
1. Rotate the blades until the ends face forward and
backward (Fig. 40). Measure from a level surface to
the cutting edge, position “A”, of the blades (Fig. 41).
Note this dimension.
m–1078
Front
A
A
Figure 40
MEASURE FROM
CUTTING EDGE TO A
LEVEL SURFACE
m–1087
Figure 41
2. Rotate the opposite ends of the blades forward.
3. Measure from a level surface to the cutting edge of the
blades at the same position as in step 1. The difference
between the dimensions obtained in steps 1 and 2 must
not exceed 1/8 in. (3 mm). If this dimension exceeds