
Operator's Manual


Secure seat suspension to seat mounting plate
with (4) flange locknuts (Fig. 6 & 7).
&$0-#
#/ .0.,#*.&+*
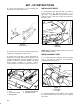
Mount seat to seat suspension with (4) capscrews,
lockwashers and flatwashers (Fig. 6 & 7).
Adjust seat for operator's comfort and weight. To
adjust seat fore and aft, pull handle on left side of seat
assembly outward (Fig. 7). Release handle to lock seat
position. To adjust for operator's weight, turn spring
tension knob; clockwise to increase tension,
counterclockwise to decrease spring tension (Fig. 7).
&$0-#
#/
0.,#*.&+* ..#) (2
+0*/&*$ ,(/#
+-1-" !'1-" %*"(#
,-&*$ /#*.&+* '*+
Install tether straps and each end of seat belt to
holes in back of seat with (2) 7/16 x 20 - 1" lg.
capscrews, 7/16 flatwashers and 7/16 lockwashers.
Tighten securely. Latch side of belt to be mounted to
left side of seat.
&$0-#
#/ #(/.
#/%#- ./-,
When operating machine, always use the seat
belt and ROPS together.
Loosely mount (2) R-clamps to outer holes in right
side of seat with (2) capscrews and flatwashers
(supplied with seat kit) (Fig. 9).
&$0-#
*0( /0 #
!(),.
Install manual tube into R-clamps, insert manual
into tube and thread cap into tube (Fig. 9). Tighten
capscrews.