
Service Manual


Mid-Size Walk Behind Service Manual 4 - 5
CHASSIS
Pistol Grip - Hydro - Fixed Deck
Checking the Parking Brake
1. Move the machine onto a level surface.
2. Disengage the power take off (PTO) and stop the
engine.
3. Set the parking brake.
Note: Setting the parking brake should take a
reasonable amount of force. If it engages too hard or
too easily, adjustment is required. Refer to ”Adjusting
the Parking Brake" on page 4 - 5.
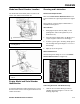
Adjusting the Parking Brake
The parking brake lever is on the right side of the
machine (Figure 32). If the parking brake does not
hold securely, adjust it.
1. Check the parking brake before you adjust it; refer
to ”Checking the Parking Brake" on page 4 - 5.
2. Release the parking brake; refer to ”Releasing the
Parking Brake" on page 4 - 4.
3. Remove the hair pin cotter and the clevis pin from
the lower brake lever (Figure 32).
4. Rotate the brake linkage yoke in to tighten the
parking brake; rotate the brake linkage yoke out to
loosen the parking brake (Figure 32).
Note: There should be approximately 1/4 inch
(6.3mm) clearance between the tire and the flat bar
when the parking brake is in the released position
(Figure 32).
5. Secure the brake linkage yoke to the lower brake
lever with the hair pin cotter and the clevis pin
(Figure 32).
6. Check the brake operation again; refer to
”Checking the Parking Brake" on page 4 - 5.
Figure 32
m-6182
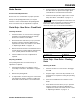
Pistol Grip - Hydro - Floating Deck
Checking the Brake
1. Park the machine on a level surface.
2. Disengage the PTO and set the parking brake.
3. Stop the engine, remove the key, and wait for all
moving parts to stop before leaving the operating
position.
4. To set the parking brake, it should take a
reasonable amount of force. If it engages too hard
or easily, adjustment is required. Refer to
”Adjusting the Brake" on page 4 - 6.
Note: When the brake is engaged, the brake handle
should be close to the 1 o’clock position.
5. If there is a reasonable amount of force, no
adjustment is required.
(1) Brake linkage yoke
(2) Flat bar (parking brake
lever in the released
position)
(3) Clevis pin
(4) Hair pin cotter
(5) 1/4 in. (6 mm)