
Operator's Manual


27
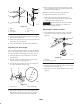
2. Remove the nut, blade bolt, cone washer, blade,
spacers, and thin washer from the spindle (Fig. 29).
m–3779
1
4
3
2
4
6
5
Figure 29
1. Blade
2. Blade bolt
3. Cone washer
4. Spacer
5. Thin washer
6. Nut
Sharpening the Blades
1. Use a file to sharpen the cutting edge at both ends of the
blade (Fig. 30). Maintain the original angle. The blade
retains its balance if the same amount of material is
removed from both cutting edges.
1
2
m–1854
Figure 30
1. Sharpen at original angle 2. Sail
2. Check the balance of the blade by putting it on a blade
balancer (Fig. 31). If the blade stays in a horizontal
position, the blade is balanced and can be used. If the
blade is not balanced, file some metal off the end of the
sail area only (Fig. 30). Repeat this step until the blade
is balanced.
1
2
m–1855
Figure 31
1. Blade 2. Balancer
Installing the Blades
1. Place the blade onto the bolt and over the cone washer.
Select the proper number of spacer(s) for the height-of-
cut, and slide the bolt into the spindle (Fig. 29).
Important The curved part of the blade must point
upward toward the inside of the mower to ensure proper
cutting.
2. Install the remaining spacer(s) and secure them with a
thin washer and a nut (Fig. 29).
3. Torque the blade bolt to 75–80 ft-lb (101–108 Nm).
Servicing the Air Cleaner
Service Interval/Specification
Foam element: Clean it after every 25 operating hours.
Paper element: Replace it after every 200 operating hours
or yearly, which ever comes first.
Inspect the foam and paper elements, and replace them if
they are damaged or excessively dirty.
Note: Service the air cleaner more frequently (every few
operating hours) if the operating conditions are extremely
dusty or sandy.
Important Do not oil the foam or paper element.
Removing the Foam and Paper Elements
1. Disengage the PTO and set the parking brake.
2. Stop the engine, remove the key, and wait for all
moving parts to stop before leaving the operating
position.
3. Clean around the air cleaner to prevent dirt from getting
into the engine and causing damage (Fig. 32).
4. Unscrew the cover knob and remove the air cleaner
cover (Fig. 32).