
Service Manual


Assembly
group
4
SPEED CONTROL
L
252
TOP SPEED LIMITER
Special
JLO
Tools
Tachometer
-
Vibration Type 000.15.300.100
DISASSEMBLY
4.3.
1
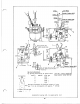
Remove carburettor from intake manifold and disconnect air vane rod
(1)
from butterfly lever
(2)
(see illustr. III and IV).
NOTE
:
The
butterfly
lever
(2)
is positioned by
2
flats on the butterfly
spindle. When removing the lever, note its original position
(see ill. IV)
.
2
Carefully unhook spring
(3)
from lever (4) and airvane
(5).
3
Loosen hex. nut
(7)
and remove screw
(6)
.
Disconnect air vane rod
(1)
.
4 Remove hex. nut
(9)
,
star washer
(10),
and adjusting lever
(4).
ASSEMBLY
NOTE
:
Carefully inspect all air vane governor parts for excessive wear or damage.
Replace if necessary. It is particularly important that the governor spring is
not over- stretched or damaged at the spring ends.
4.4. 1 Connect air vane rod
(1)
to air vane
(5).
Fit hex. screw
(6)
through
air vane
(5)
,
fit hex. nut
(7)
and lock washer
(8)
,
and install in boss
provided on cylinder (see illustr. I). Do not apply any lubricant to
air vane/spindle!
2
Tighten hex. nut
(7)
so
that air vane moves freely radially on hex.
screw (spindle)
(6)
with only a little axial play.
3 Connect other end of air vane rod
(1)
to lever
(2)
of carburettor
butterfly spindle. Install carburettor on intake manifold.
NOTE
:
With the air vane in position
"C",
the butterfly valve in the carburet-
tor must be in the fully open position (throttle wide open).
4 Install adjusting lever
(4)
with star washer
(10)
and hex. nut
(9).
5
Carefully hook spring (3) into both holes
of
air vane
(5)
and lever
(4)
as shown in illustr. II.
SPEED ADJUSTMENT
6
Start the engine, observing safety regulations.
7
Loosen hex, nut
(9)
,
insert small punch or drill into hole provided in
lever, and rotate lever to obtain desired engine speed.
NOTE
:
A
=
Higher spring tension
=
higher speed
B
=
lower spring tension
=
lower speed
8
When desired speed has been obtained, tighten hex. nut
(9)
securely and
re-check engine speed with tachometer.