
Operator's Manual

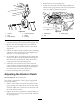


Figure58
36inchand52inchMowerDecks
1.SailAreaofBlade4.Curvedwasher
2.Blade5.BladeBolt
3.Bladestiffener
SharpeningtheBlades
1.Usealetosharpenthecuttingedgeatbothends
oftheblade(Figure59).Maintaintheoriginalangle.
Thebladeretainsitsbalanceifthesameamountof
materialisremovedfrombothcuttingedges.
Figure59
1.Sharpenatoriginalangle
2.Checkthebalanceofthebladebyputtingitona
bladebalancer(Figure60).
3.Ifthebladestaysinahorizontalposition,theblade
isbalancedandcanbeused.Ifthebladeisnot
balanced,lesomemetalofftheendofthesailarea
only(Figure57)
4..Repeatthisprocedureuntilthebladeisbalanced.
Figure60
1.Blade2.Balancer
InstallingtheBlades
1.Installthebladeontothespindleshaft(Figure57).
Important:Thesailpartoftheblademustbe
pointingupward,towardtheinsideofthemower
toensurepropercutting(Figure57).
2.For40inchand48inchmowerdecks,installthe
blade,curvedwasher,andbladebolt(Figure57).
3.For36inchand52inchmowerdecks,installthe
blade,stiffener,curvedwasher,andbladebolt
(
Figure58).
4.Torquethebladeboltto85-110ft-lb(115-140N-m).
CorrectingtheMowerQuality
ofCut
Ifonedeckbladecutslowerthantheother,correctas
follows.
Note:Tireairpressureiscriticalintheseprocedures.
Makesurealltireshavecorrectpressure.
1.DisengagethePTOandsettheparkingbrake.
2.Stoptheengine,removethekey,andwaitforall
movingpartstostopbeforeleavingtheoperating
position.Disconnectthesparkplugwire(s)from
thesparkplug(s).
3.Adjustthetirepressureinthe
reartirestospecications;referto
DriveSystemMaintenance(page30).
4.Checkthatthebladesandspindleshaftsarenot
bent.RefertoCheckingforBentBlades.
5.Settheheight-of-cuttothe4inch(101.6mm)
position.RefertoAdjustingtheHeight-Of-Cutin
Operation(page12).
6.PerformthestepsinthefollowingsectionsFrame
SetUp,CheckingFront-to-RearPitch,andChecking
Side-to-SideLeveling.
39