
Service Manual


56
GTS 200
Cylinder
and Bearings
Cylinder
and Bearings
Contents
Cylinder 56.
. . . . . . . . . . . . . . . . . . . . . . . . . . . . . . . . . . . . . . .
Inspection 56
. . . . . . . . . . . . . . . . . . . . . . . . . . . . . . . . . .
Cylinder Finish (Cross Hatch)
56
. . . . . . . . . . . . . . . . . . .
Cylinder Cleaning
56
. . . . . . . . . . . . . . . . . . . . . . . . . . . .
Check Plain or DU
Bearings
57
. . . . . . . . . . . . . . . . . .
Check Camshaft Bearings
57
. . . . . . . . . . . . . . . . . . . . . .
Plain or DU
Bearings
57
. . . . . . . . . . . . . . . . . . . . . . . . . . . .
Repair W
orn Aluminum Bearings
57
. . . . . . . . . . . . . . . .
Remove DU
Magneto Bearing
57
. . . . . . . . . . . . . . . . .
Install Magneto DU
Bushing
57
. . . . . . . . . . . . . . . . . .
Oil Seals
58
. . . . . . . . . . . . . . . . . . . . . . . . . . . . . . . . . . .
Crankcase Sump
58
. . . . . . . . . . . . . . . . . . . . . . . . . . . . . . . . . .
Install 58
. . . . . . . . . . . . . . . . . . . . . . . . . . . . . . . . . . . . . .
Specification T
ables 58
. . . . . . . . . . . . . . . . . . . . . . . . . . . . . . .
Cylinder
GTS 200 OHV engines use aluminum alloy plain bearings as
part of the cylinder material.
Inspection
Always inspect cylinder after engine has been disassembled.
V
isual inspection will show if there are any cracks, stripped
bolt holes, broken fins or if cylinder wall is damaged.
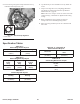
Use Telescoping Gauge and Dial Caliper
, or inside micrometer
to determine size of cylinder bore.
Measure at right angles, Fig. 138.
1
5
4
3
2
Fig. 138
– Checking Cylinder Bore
1. Top
2. Center
3. Bottom
4. Measure
at six points
5. Center
of piston ring travel
T
able No. 4,
page 58 lists standard cylinder bore sizes.
If the cylinder bore is more than .003” (.08mm) oversize, or
.0015” (.04mm) out of round, it must be replaced.
Note:
If cylinder bore is within specification and shows no
sign of scoring or other damage, new piston rings may be
installed providing cylinder bore is reconditioned using a rigid
hone with finishing stones, to restore the proper cross hatch
angle in the cylinder bore.
Note:
When installing new piston rings in a cylinder bore that
is within specification shown, the cylinder bore should be
reconditioned. The proper cylinder cross hatch ensures proper
ring lubrication and break-in. Some engine models produced
at the factory have diamond bored cylinders which do not
exhibit a cross hatch finish. The diamond bore cylinders are
reconditioned using the same procedure as a conventional
cylinder.
Cylinder Finish (Cross Hatch)
The
finish on a reconditioned cylinder should have a
crosshatch appearance, Fig. 139. Proper stones, lubrication
and drill speed along with rapid movement of hone within the
cylinder during the last few strokes, will produce this finish.
Crosshatching aids proper lubrication.
45_
Fig. 139
– Cross Hatch
Note: T
o produce the proper cross hatch finish use a drill
speed of approximately 200 RPM and 40-60 strokes per
minute.
Lubricate hone liberally to prevent build up on finishing
stones.
Note:
A carpenter
’
s brace can also be used to produce proper
crosshatch in cylinder bore.
Cylinder Cleaning
Note: I
t i
s m
os
t i
mportan
t t
ha
t t
h
e e
ntir
e c
ylinde
r a
n
d c
rankcase
b
e t
horoughl
y c
leane
d a
fter honing.
W
ash the cylinder and crankcase carefully in commercial parts
cleaning solvent. Thoroughly wash cylinder and crankcase
using a stif
f brush with soap and hot water
. Clean until all
traces of honing grit are gone.
Note:
Honing grit is highly abrasive and will cause rapid wear
to all of the internal components of the engine unless it is
completely removed.