
Service Manual


Head Disassembly
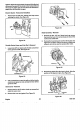
1. Hold the rocker arm adjusting nut with a 10 mm wrench
and loosen the socket head jam screw with a3 mm hex
key. See Figure
57.
Figure
57
2.
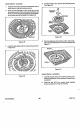
Remove the adjusting nuts and rocker arms.
3.
The spring rate on the valve springs allows removal
without the aid of a spring compressor. Remove the
springs and keepers as shown in Figure 58. The
intake and exhaust springs and keepers are the same
and can be used on either valve.
Figure
58
4. Note the seal and washer that is used on the intake
valve. See Figure 59. The seal will help prevent
oil
from entering the combustion chamber through the
intake valve guide.
GTS
150
35
Figure
59
Valves and Seats Reconditlonlng
The intake and exhaust valve seats on the
GTS
150 are
factory cut to
44
degrees. The intake and exhaust valves
are factory ground to 44.75 degrees. When reconditioning,
the seats should be cut to 45 degrees and the valves
should be ground to 45 degrees. The valves are then
lapped into the seat for a proper seal.
1.
Use Briggs
&
Stratton valve lapping
tool
#19258 and
lapping compound #94150 for lapping valves and
seats.
2.
The lapped valve seat width should be 3/64
-
1/16" (1.2
1.6 mm). If the seat
is
wider than this dimension
a
narrowing stone or cutter should be used to bring the
dimension into specification. See Figure 60.
3. The valve margin should be at least 1/64” (.4mm) after
regrinding to 45 degrees. Replace the valve
if
the
margin
is
less than the specification after regrinding.
Refer to Figure
60.
4.
,
If the valve seats are burned or damaged the cylinder
head must be replaced.
Engine