
Service Manual


before
it
affects normal operation, proceed to
Step
5.
5.
Start the engine
if
not already running.
6.
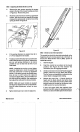
Push the control bar down to
its
lowest position,
latching the mechansim. See Figure
28.
BAR
Figure
28
7.
Slowly
lift
the control bar to a point where the bag
just begins to inflate (about
5'
below the handle).
This indicates that the mower blade is engaged
and has begun to rotate.
NOTE:
This intermediate position
is
not the
'natural' operating position of the control bar.
However,
it
has proven to be useful in early
detection of latent
BBC
sticking which could
create an unsafe condition later in the life of the
mower.
8.
Release the control bar.
NOTE: If
a 'bang' is heard and the bag
immediately deflates, the control bar had been
raised too far. Repeat steps
5,
6,
and
7,
but do
not raise the handle as high as the last time.
If
the control bar 'hangs up" and the blade does
not stop quickly, you should stop the blade
before shutting
the
engine off, This can be done
by raising the control bar to the normal operating
position and releasing
it.
SELF-PROPEL
SYSTEM
Self-Propel
System
Lubrication
1.
Move the rear wheel height-of-cut levers to the
'C'
setting.
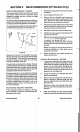
Wipe
grease fittings with a clean rag
as
shown in Figure
29.
Install grease gun onto
the fitting and gently apply one
or
two
pumps of
No.
2
multi-purpose lithium-base grease.
Figure
29
Self-Propel System Adjusting Wheel Drive
If
the mower does not self-propel or creeps forward
when the drive is not engaged, then adjustment to the
wheel traction control cable is necessary.
1.
Stop the engine. Pull the wire
off
the spark plug.
2.
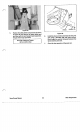
Loosen bottom jam nut on the wheel traction
cable
as
shown in Figure
30.
Figure
30
Vacu-Power Mower
27
Maintenance