
Operator's Manual


12.Installthetraction-pedalassembly;refertoRemoving
theTraction-pedalAssembly(page70).
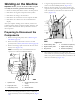
InstallingtheTraction-pedalAssembly
1.Connectthe6-socketconnectorofthemachine
harnesstothe6-pinconnectorofthetraction-pedal
sensor(Figure109).
2.Aligntheholesintheplateofthetraction-pedal
assemblywiththeholesinthechassisofthemachine
(Figure109).
3.Securethetraction-pedalassemblytothechassisof
themachinewiththe4hex-angedheadbolts(6x25
mm);refertoFigure109.
ChangingtheHydraulic-returnFilter
ServiceInterval:Every500hours
Note:Changethehydraulic-chargelterwhenyouchange
thehydraulic-returnlter.
Note:Youcanaccessthehydraulic-returnlterfrom
underneaththerear-attachmentplateofthemachine(Figure
111).
1.Placeacontainerunderthehydraulic-returnlter
(Figure111).
Figure111
1.Containersuitablefor
hydraulicuid
3.Hydraulicreturnlter
2.Sharpobject
4.Rear-attachmentplate
2.Puncturethebottomofthehydraulic-returnlter
andallowtheresidualhydraulicuidtodraininthe
container(Figure111).
Note:Useatapered-centerpunchorawltopuncture
theltercase.
3.Rotatethehydraulic-returnltercounterclockwiseand
removethelter(Figure111).
Note:Discardthelterproperly.
4.Applyathinlayerofthespeciedhydraulicuidto
theO-ringofthenewlter.
Important:Donotusealterstrapwrenchto
tightenthelter.Astrapwrenchcandentthe
lter,causingittoleak.
5.Installthenewlter.
Note:Useyourhandstotightenthelteranadditional
halfturnaftertheltermakescontactwiththelter
head.
6.Checkthelevelofthehydraulicuidinthehydraulic
reservoir;refertoCheckingtheHydraulic-FluidLevel
(page25).
7.Starttheengineandrunitatidlefor1or2minutes.
8.Stoptheengineandremovethekey.
9.Checkaroundthelterforleaks.
10.Checktheuidlevelofthehydraulicreservoir,andadd
uid,ifnecessary;refertoFillingtheHydraulic-uid
Reservoir(page69).
71