
Installation Instructions


6.Repeatsteps1through5fortheotherwearplateand
stabilizershoe.
PositioningtheSeatforPlowing
Fastentheseatbeltandrotatetheseatclockwise.
Note:Youmustbeseatedintheoperatorseatbeforemoving
thetractionunit;otherwise,theenginewillstopin1second.
PreparingtheTractionUnit
1.Starttheengineofthetractionunit;refertothe
Operator’sManualofthetractionunit.
2.Settheendingspeedtothe1/2throttleposition,and
allowtheenginetowarmupfor3to5minutes.
3.Ensurethatthevibratoryplowisinthetransport
position;refertoLockingtheTransportLock(page
28).
4.Movethetractionunittotheworksite.
PlowingCableandTubing
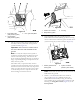
WARNING
Aworkingvibratoryplowcaninjureorkillyou.
Beforeyoubeginusingthevibratoryplow,make
surethatallpeopleareawayfromthedangerarea.
Figure77
1.Dangerarea(shadedareainthegure)
Important:Youwillreducethelifeofthecableplowif
youoperatetheblade-vibrationfunctionwhiletheblade
isoutoftheground.
LoweringthePlowintotheGround
Important:Knowthelocationofallunderground
utilitiesbeforeoperatingtheequipmentontheworksite.
1.Releasethecableplowfromthetransportposition;
refertoUnlockingtheTransportLock(page28).
2.Insertthecablethatyouareinstallingattheworksite
intothechute;refertoInstallingCableintotheCable
Chute(page32).
3.Movethebackllblade/vibratoryplowjoysticktoward
youtolowertheplowbladetothesurfaceofthesoil.
Note:Anchortheendofthecableasnecessary.
Important:Donotstarttheblade-vibration
functionoftheplowuntilthebladehasentered
theground.
4.Releasetheparkingbrake;refertotheOperator’sManual
forthetractionunit.
5.Beginloweringthebladeintothegroundbyperforming
thefollowingsteps:
A.Presstheupperhalfoftheelevation-oatswitch
toallowtheplowtoFloatvertically(Figure78).
Note:Slowlylowerthebladeintotheground.
Figure78
1.Float(elevation-oat
switch)
2.Off(elevation-oatswitch)
B.Ontheutility-tractionjoystick,usethedown-shift
buttonofthegear-selectorswitchtoshiftthe
transmissiontogear1(Figure79).
Note:Whenyourststartthemachine,gear1
isselected.
34