
Installation Instructions


InstallingtheGutterBrush
Important:Youmaydiscardallremovedparts
unlessotherwisenoted.
WARNING
Seekimmediatemedicalattentionifuidis
injectedintoskin.Injecteduidmustbe
surgicallyremovedwithinafewhoursbya
doctor.
•Ensurethatallhydraulic-uidhoses
andlinesareingoodconditionandall
hydraulicconnectionsandttingsaretight
beforeapplyingpressuretothehydraulic
system.
•Keepyourbodyandhandsawayfrom
pinholeleaksornozzlesthateject
high-pressurehydraulicuid.
•Usecardboardorpapertondhydraulic
leaks.
•Safelyrelieveallpressureinthehydraulic
systembeforeperforminganyworkonthe
hydraulicsystem.
1.Removethenutandboltsecuringthehose
clamptothemanifoldmountingbracketonthe
leftsideofthemachineandremovetheclamp.
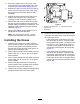
2.Installthegutterbrushmanifoldtothemanifold
mountingbracketwiththe3bolts(7/16x1inch),
lockwashers,andatwashers(Figure1).
g269186
Figure1
1.Bolt(7/16x1inch)
3.Flatwasher
2.Lockwasher
4.Gutterbrushmanifold
3.Removethebolt,lockwasher,andretaining
washerfromthebottomofthegutter-brush
broommotor.
4.Installthebrushheadtothegutterbrushusing
thebolt,lockwasherandretainingwasher
(Figure2).
g284029
Figure2
1.Gutterbrushmotorshaft
3.Lockwasher
2.Retainingwasher4.Bolt
5.Positionthegutterbrushonthedesiredside
ofthepick-upbroomandinstallthehitchpin
throughthemountholes(Figure3).
g269239
Figure3
1.Hitchpin3.Hitchclip
2.Gutterbrushmount(left
side)
4.Gutterbrushmount(right
side)
2