
Operator's Manual


DriveSystem
Maintenance
AdjustingtheSelf-propelDrive
Ifthemachineisnew,doesnotself-propel,orittendsto
creepforward,adjustthedrivecable.
1.Movethemachineoutsideandontoapavedsurface
nearasolidwalltosafelypreventthemachinefrom
movingforwardwhiletheengineisrunning.
2.Positionthemachinewiththefronttiresagainstthe
wall.
Note:Ensurethattheareaiswellventilatedandclear
ofdebristhatcouldbethrownbythemachine.
3.Shiftthetransmissiontothirdgear.
4.Starttheengine;refertoStartingtheEngine(page12).
5.Pulltheself-propel-drivebartothehandle.
Note:Thewheelsshouldstarttoturnasthe
self-propel-drivebarjusttouchesthehandle.
6.Shutofftheengine.
7.Ifyoumustadjustthemachine,dothefollowing:
•Ifthewheelsdonotspinwhenyouengagethe
self-propel-drivebar,thetractionbeltistooloose.
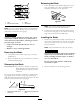
Rotatethewheel-drive-controlknob(Figure23)
clockwise1turnandrepeatsteps4through6.
Figure23
1.Wheel-drive-controlknob
•Ifthewheelsspinbeforeyoufullyengagethe
self-propel-drivebar,thetractionbeltistootight.
Rotatethewheel-drive-controlknob(Figure23)
counterclockwise1turnandrepeatsteps4through
6.
8.Foranewtractionbelt,rotatethedrivecable
adjustmentknobclockwise1additionalturntoallow
forthenormalstretchingofthebeltduringthebreak-in
period.
Note:Youcanskipthisstepifyouareadjustinga
usedbelt.
BladeMaintenance
MaintainingtheBlade
Alwaysmowwithasharpblade.Asharpbladecutscleanly
andwithouttearingorshreddingthegrassblades.
1.Stoptheengineandwaitforallmovingpartstostop.
2.Disconnectthewirefromthesparkplug.
3.Closethefuelvalvebymovingthefuel-valveleverto
theleft(Figure12).
4.Drainthegasolinefromthefueltank.
5.Tipthemachineontoitsrightside(aircleanerup)as
showninFigure24.
Figure24
1.Blade3.Bladeboltandlockwasher
2.Accelerator
InspectingtheBlade
ServiceInterval:Beforeeachuseordaily—Inspectthe
mowerbladesforwearordamage.
Carefullyexaminethebladeforsharpnessandwear,especially
wheretheatandthecurvedpartsmeet(Figure25A).
Becausesandandabrasivematerialcanwearawaythemetal
thatconnectstheatandcurvedpartsoftheblade,check
thebladebeforeusingthemachine.Ifyounoticeaslotor
wear(Figure25BandFigure25C),replacetheblade;referto
RemovingtheBlade(page20).
19