
Operator's Manual

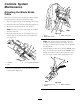


Figure35
1.Sail
3.Wear
2.Flatpartoftheblade4.Slotformed
Note:Forthebestperformance,installanewblade
beforethecuttingseasonbegins.Duringtheyear,le
downanysmallnickstomaintainthecuttingedge.
DANGER
Awornordamagedbladecanbreak,andapiece
ofthebladecouldbethrownintotheoperator’s
orbystander’sarea,resultinginseriouspersonal
injuryordeath.
•Inspectthebladeperiodicallyforwearor
damage.
•Replaceawornordamagedblade.
RemovingtheBlade
Grasptheendofthebladeusingaragorathickly
paddedglove.Removethebladenuts,theanti-scalpcup,
andtheblade(Figure34).
SharpeningtheBlade
Filethetopsideofthebladetomaintainitsoriginal
cuttingangle(Figure36A)andinnercuttingedgeradius
(
Figure36B).Thebladewillremainbalancedifyou
removethesameamountofmaterialfrombothcutting
edges.
Figure36
1.Sharpenatthisangleonly.
2.Maintaintheoriginalradius
here.
BalancingtheBlade
1.Checkthebalanceofthebladebyplacingthecenter
holeofthebladeoveranailorscrewdrivershank
clampedhorizontallyinavise(Figure37).
Figure37
Note:Youcanalsocheckthebalanceusinga
commerciallymanufacturedbladebalancer.
2.Ifeitherendofthebladerotatesdownward,lethat
end(notthecuttingedgeortheendnearthecutting
edge).Thebladeisproperlybalancedwhenneither
enddrops.
InstallingtheBlade
1.Installasharp,balancedToroblade,theanti-scalp
cup,andthebladenuts.Thesailoftheblademust
pointtowardthetopofthemowerhousingfor
properinstallation.Torquethebladenutsto23to
27ft-lb(32to37N-m).
2.Returnthemowertoitsoperatingposition.
3.Connectthewiretothesparkplug.
24