
Installation Instructions


Step
3
Installing the Switch
Parts needed for this step:
1
Switch
1
Thermal fuse, 15 amp
1
Clevis pin, long
1
Cotter pin
Procedure
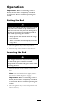
1. R emo v e the plug from the hole in the right
side of the dash ( Figure 7 ).
Note: If the hole in the dash is in use ,
measure o v er 1/2 inc h (13 mm) and cut
another 0.835 inc h x 1.46 inc h (21 mm x 35
mm) rectangular hole in the dash. Mak e sure
not to damag e any existing components behind
the dash when cutting the hole .
Figure 7
1. Plugged hole
3. Cut new hole (if required).
2. Switch
2. Plug the switc h into the har ness connector in
the dash. Inser t the switc h into the hole in the
dash ( Figure 7 ).
3. R emo v e the co v er to expose the fuse bloc k.
Install a new ther mal fuse (15 amp) into the
open slot in the fuse bloc k. Install the co v er .
4. Plug the actuator har ness into the v ehicle
har ness connector , located near the fuse bloc k.
5. Install the batter y and connect the cables .
6. Press the switc h upw ard to extend the actuator
rod until it is aligned with the mounting holes
in the upper lift brac k et. Secure the rod to the
brac k et with the clevis pin and cotter pin.
7. R emo v e the screws and clip securing the prop
rod to the frame rail ( Figure 8 ).
Figure 8
1. Prop rod 3. Prop rod bracket
2. Prop rod clip
8. R emo v e the screws securing the prop rod
brac k et to the underside of the bo x. R emo v e
the retainer securing the rod to the brac k et and
remo v e the rod ( Figure 8 ). R etain the prop rod
components for future use .
Note: If the electric bo x lift is ev er remo v ed,
install the prop rod, prop rod clip , and prop
rod brac k et.
5