
Operator's Manual


GB–8
Assembly
Handle
Assembly
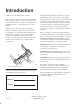
1. Loosen knobs on mounting brackets (Fig. 1).
1
2
3
1693
2
Figure 1
1. Knob
2. Handle bracket
3. Housing pocket
2. Position mounting brackets in a vertical position
so that holes face up.
3. Slide handle ends into holes in mounting
brackets until handle ends are completely seated
in brackets (Fig. 1). Make sure cables are
positioned on top of left mounting bracket
(Fig. 2).
4. Rotate handle and mounting brackets rearward
until brackets fit securely into housing pockets
(Fig. 2).
5. Tighten knobs until edges of slots on top of
mounting brackets touch.
6. Use cable ties to secure cables to left handle
(Fig. 2).
Note: Make sure cables do not interfere with
the raising or lowering of discharge
door.
1
2
1694
Figure 2
1. Cable tie 2. Cables
Starter Rope
1. Pull starter rope through rope guide on handle
(Fig. 3). By squeezing control bar to handle,
blade brake will release and allow rope to be
pulled up easily to loop.
1690
1
2
Figure 3
1. Recoil starter 2. Rope guide