
Operator's Manual


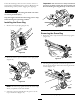


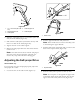


Figure49
1.Cablemount2.Cablejacket
Note:Movingthecablejacketupwarddecreases
thegroundspeed;movingthejacketdownward
increasesthegroundspeed.
5.Tightenthenutrmly.
6.Startthemowerandchecktheadjustment.
Note:Iftheself-propeldriveisnotproperly
adjusted,repeatthisprocedure.
ReplacingtheBlade
ServiceInterval:Yearly
Important:
Y ou will need a torque wr ench to install
the blade pr oper l y
.Ifyoudonothaveatorque
wrenchorareuncomfortableperformingthis
procedure,contactanAuthorizedServiceDealer.
Examinethebladewheneveryourunoutofgasoline.If
thebladeisdamagedorcracked,replaceitimmediately.
Ifthebladeedgeisdullornicked,haveitsharpenedor
replaceit.
WARNING
Thebladeissharp;contactingthebladecanresult
inseriouspersonalinjury.
Weargloveswhenservicingtheblade.
1.Disconnectthesparkplugwirefromthesparkplug.
RefertoPreparingforMaintenance.
2.Tipthemowerontoitsside,withtheairlterup.
3.Useablockofwoodtoholdthebladesteady
(
Figure50).
Figure50
4.Removetheblade,savingallmountinghardware
(
Figure50).
5.Installthenewbladeandallmountinghardware
(
Figure50).
Important:Positionthecurvedendsofthe
bladetopointtowardthemowerhousing.
6.Useatorquewrenchtotightenthebladeboltto
60ft-lb(82N⋅ ⋅
⋅
m).
Important:Abolttorquedto60ft-lb(82N⋅ ⋅
⋅
m)
isverytight.Whileholdingthebladewitha
blockofwood,putyourweightbehindthe
ratchetorwrenchandtightentheboltsecurely.
Thisboltisverydifculttoovertighten.
CleaningtheMower
ServiceInterval:Beforeeachuseordaily
WARNING
Themowermaydislodgematerialfromunderthe
mowerhousing.
•Weareyeprotection.
•Stayintheoperatingposition(behindthe
handle).
•Donotallowbystandersinthearea.
1.Withtheenginerunningonaatpavedsurface,
sprayastreamofwaterinfrontoftherightrear
wheel(
Figure51).
Note:Thewaterwillsplashintothepathofthe
blade,cleaningouttheclippings.
19