
Service Manual


16
GTS 200
Ignition
Inspect
Flywheel Key
, Keyways,
Flywheel, and Crankshaft
Inspect
flywheel key for partial or complete shearing. If
sheared, replace, Fig. 15. Flywheel should be inspected for
cracks, burrs on taper or keyway, and distortion of keyway
.
Check taper of crankshaft for burrs, rust, oil, or other damage.
Check cooling fan or flywheel for broken fins. If parts are
damaged, replace with new parts.
1 2
Fig. 15 – Inspect Flywheel Key
1. OK 2. Replace
Install
Flywheel
Install Flywheel
1. Clean
flywheel taper and crankshaft taper of all grease, oil
and dirt.
2.
Slide flywheel onto crankshaft and line up both keyways.
Insert flywheel key into both keyways.
Note:
DO NOT use a steel key under any circumstances.
WARNING
DO NOT use impact wr
enches to install flywheel.
3.
Install starter cup, cooling fan, and flywheel nut or screw
.
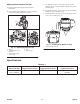
4.
Use flywheel holder to hold flywheel from turning,
Fig. 16.
5.
Install flywheel nut or screw
.
6.
Use socket and torque wrench to tighten flywheel nut or
screw.
7. T
orque as listed in T
able No. 1, Page 17.
1
2
Fig. 16 – Torquing Flywheel
1. Briggs
& Stratton T
ool
#19321,
flywheel holder or
Tool
# 19372 flywheel
strap wrench
2. Cup
Install Ignition Armature
1. Install
stop switch wire on armature, Fig. 12, Page 15.
2. T
urn flywheel so magnet is away from armature.
3.
Install armature and mounting screws, Fig. 17.
Note:
Mounting holes in armature are slotted.
1
2
Fig. 17
– Installing Armature
1. Ignition
armature
2. T
ighten one screw
4. Push
armature away from flywheel as far as possible and
tighten one screw to hold armature in place.