
Operator's Manual


Maintenance
Note: Deter mine the left and right sides of the mo w er b y standing in the operating position.
Recommended Maintenance Schedule(s)
Maintenance Service
Interval
Maintenance Procedure
After the rst 5 operating
hours
• Change the engine oil.
Before each use or daily
• Check the engine oil level.
• Remove grass clippings and dirt from under the housing.
Every 25 hours
• Check the spark plug (refer to your engine operator’s manual).
• Replace the air lter; replace it more frequently in dusty operating conditions.
• Replace the blade or have the blade sharpened; replace it or have it sharpened
more frequently if the edge dulls quickly.
Every 50 hours
• Change the engine oil.
• Lubricate the self-propel drive.
Every 100 hours
• Replace the spark plug (refer to your engine operator’s manual).
• Clean the cooling system (refer to your engine operator’s manual).
Yearly or before storage
• Empty the fuel tank before repairs as directed or before annual storage.
Important: R efer to y our engine operator’ s man ual f or additional maintenance pr ocedur es.
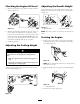
Preparing for Maintenance
1. Stop the engine and w ait for all mo ving par ts to stop .
2. Disconnect the spark plug wire from the spark plug
before perfor ming any maintenance procedure ( Figure
28 ).
Figure 28
3. After perfor ming the maintenance procedure(s),
connect the spark plug wire to the spark plug .
Note: Before tipping the mo w er to c hang e the oil
or re place the blade , allo w the fuel tank to r un dr y
through nor mal usag e . If y ou m ust tip the mo w er prior
to r unning out of fuel, use a hand fuel pump to remo v e
the fuel. Alw a ys tip the mo w er onto its side (with the
air filter up).
Tipping the mo w er may cause the fuel to leak.
Gasoline is flamma ble, explosi v e and can cause
per sonal injur y .
R un the engine dr y or r emo v e the gasoline with a
hand pump; nev er siphon.
Replacing the Air Filter
R e place the air filter yearly; re place it more frequently in
dusty operating conditions .
R efer to Pre paring for Maintenance .
1. Use a screw dri v er to open the air filter co v er ( Figure
29 ).
Figure 29
2. R e place the air filter ( Figure 30 ).
11