
Operator's Manual


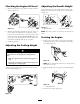


Figure 27
3. Slide the c hute o v er the opening with the slots in the
c hute lined up with the tabs under the co v er ( Figure 27 ).
4. Close the co v er .
Removing the Side Discharge Chute
1. Open the side opening co v er and remo v e the side
disc harg e c hute .
2. Close the co v er .
3. R emo v e the knob .
4. Install the side co v er clamp and the knob , securing the
side opening co v er .
If the side opening co v er is not secur el y clamped
in place, de bris could be thr o wn out of the side
opening . T hr o wn de bris can cause serious per sonal
injur y or death to the operator or bystander s.
Al w ays ensur e that either the side opening co v er is
closed and lock ed in place by the side co v er clamp
or that the side discharge chute is secur el y in place
bef or e star ting the mo w er .
Operating Tips
General Mowing Tips
• Clear the area of stic ks , stones , wire , branc hes , and
other debris that the blade could hit.
• A v oid striking solid objects with the blade . Nev er
deliberately mo w o v er any object.
• If the mo w er strik es an object or star ts to vibrate ,
immediately stop the engine , disconnect the wire from
the spark plug, and examine the mo w er for damag e .
• F or best perfor mance , install a new blade before the
cutting season begins .
• R e place the blade when necessar y with a T oro
re placement blade .
Cutting Grass
• Cut only about a third of the g rass blade at a time . Do
not cut belo w the 51 mm setting unless the g rass is
sparse or it is late fall when g rass g ro wth begins to slo w
do wn. R efer to Adjusting the Cutting Height.
• W hen cutting g rass o v er 15 cm tall, mo w at the highest
cutting height setting and w alk slo w er; then mo w ag ain
at a lo w er setting for the best la wn appearance . If the
g rass is too long, the mo w er ma y plug and cause the
engine to stall.
• Mo w only dr y g rass or lea v es . W et g rass and lea v es tend
to clump on the yard and can cause the mo w er to plug
or the engine to stall.
W et g rass or lea v es can cause serious injur y if
y ou slip and contact the blade. Mo w onl y in dr y
conditions.
• Alter nate the mo wing direction. T his helps disperse the
clippings o v er the la wn for ev en fer tilization.
• If the finished la wn appearance is unsatisfactor y , tr y one
or more of the follo wing:
– R e place the blade or ha v e it shar pened.
– W alk at a slo w er pace while mo wing .
– Raise the cutting height on y our mo w er .
– Cut the g rass more frequently .
– Ov erlap cutting sw aths instead of cutting a full
sw ath with eac h pass .
– Set the cutting height on the front wheels one notc h
lo w er than the rear wheels . F or example , set the
front wheels at 51 mm and the rear wheels at 64
mm.
Cutting Leaves
• After cutting the la wn, ensure that half of the la wn
sho ws through the cut leaf co v er . Y ou ma y need to
mak e more than one pass o v er the lea v es .
• If there are more than 13 cm of lea v es on the la wn, set
the front cutting height one or tw o notc hes higher than
the rear cutting height.
• Slo w do wn y our mo wing speed if the mo w er does not
cut the lea v es finely enough.
10