
Service Manual


20
GTS 200
Carburetion
Carburetor Cleaning Recommendations
1. Disassemble
carburetor
.
2.
Remove all old gaskets, seals and sealing material.
3.
Use commercial carburetor cleaning solvents to clean
carburetor parts and body
.
4.
When cleaning non-metallic parts (plastic, nylon,
Minlon
, etc.), do not leave in commercial carburetor
cleaner bath more than 15 minutes.
Note:
Parts containing rubber
, such as seals, “O” rings or
pump diaphragms should never be placed in commercial
carburetor cleaner bath.
5.
Use only compressed air (blowing in both directions) to
clean out all openings and passages.
Note:
Do not
use wires, drills or any other devices to clean out
metering holes or passages.
Assemble Carburetor
Install
W
elch Plug
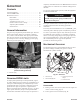
1. Install
welch plug(s) with pin punch slightly smaller than
outside diameter of plug, Fig. 26.
1
2
Fig. 26 – Installing W
elch Plug
1. Welch
plug
2.
Pin punch
2. Press
in until plug is flat. Do not cave in plug.
3.
After plug is installed, seal outside edge of plug with
fingernail polish or non-hardening sealant.
Install Throttle Shaft
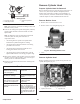
1. Install
throttle shaft and foam washer
.
2. T
urn shaft until flat is facing out.
3.
Lay throttle plate on shaft with numbers facing out and
install screw
, Fig. 27. Use a new patchlock screw
, or use
Loctite to secure screw in place.
1
2
3
Fig. 27 – Installing Throttle Shaft
1. Numbers
2. Throttle
shaft
3.
Foam washer
Install
Inlet Needle Seat
Install
inlet needle seat with groove down using Briggs &
Stratton T
ool #19057, Bushing Driver
, until seated, Fig. 28.
1
ÇÇ
ÇÇ
2
Fig. 28 – Installing Inlet Needle Seat
1. Bushing
driver tool
#19057
2. Groove
Install Inlet Needle and Float
1. Install
inlet needle on float and install assembly on
carburetor body
.
2.
Insert float hinge pin and center pin between float pin
bosses. Float height is non-adjustable.
3.
Install rubber gasket on carburetor and lay float bowl on
body.