Form No. 3364-586 Rev A 22in Recycler® Lawn Mower Model No. 20333—Serial No. 310000001 and Up Model No. 20333C—Serial No. 310000001 and Up Operator's Manual Replacement parts are available from an Authorized Service Dealer or at www.shoptoro.com. Introduction Model No. This rotary-blade, walk-behind lawn mower is intended to be used by residential homeowners. It is designed primarily for cutting grass on well-maintained lawns on residential properties.
Emission Control Regulation of emission systems, maintenance, and warranty. Replacements may be ordered through the engine manufacturer. • Never direct discharged material toward anyone. Avoid discharging material against a wall or obstruction. Material may ricochet back toward the operator. Stop the blade when crossing gravel surfaces. For models with stated engine horsepower, the gross horsepower of the engine was laboratory rated by the engine manufacturer in accordance with SAE J1940.
Children WARNING Exhaust contains carbon monoxide, an odorless, deadly poison that can kill you. Tragic accidents can occur if the operator is not alert to the presence of children. Children are often attracted to the machine and the mowing activity. Never assume that children will remain where you last saw them. Do not run the engine indoors or in an enclosed area. • Keep children out of the mowing area and under the watchful care of a responsible adult other than the operator.
Safety and Instructional Decals Important: Safety and instruction decals are located near areas of potential danger. Replace damaged decals. Manufacturer’s Mark 1. Indicates the blade is identified as a part from the original machine manufacturer. 114-7982 1. Warning—read the Operator’s Manual. 2. Thrown object hazard—keep bystanders a safe distance from the machine. 3.
Setup 1. Remove the handle knobs from the mower housing (Figure 4). Important: Remove and discard the protective plastic sheet that covers the engine. Important: Route the cables to the outside of the handle knobs as you install the handle. 1 Installing the Blade Control Bar No Parts Required Procedure Install the blade control bar into the upper handle (Figure 3). Figure 4 2. Move the handle to the operating position. 3. Install and tighten the handle knobs that you removed in step 1 (Figure 4).
Product Overview 3 Filling the Engine with Oil No Parts Required Procedure Your mower does not come with oil in the engine, but it does come with a bottle of oil. 1. Remove the dipstick (Figure 5). Figure 6 1. 2. 3. 4. 5. 6. 7. Handle Blade control bar Ignition switch Fuel tank cap Oil fill/dipstick Washout port (not shown) Spark plug 8. 9. 10. 11. 12. 13. 14.
Operation Checking the Engine Oil Level Filling the Fuel Tank Service Interval: Before each use or daily 1. Remove the dipstick, wipe it clean, and fully install the dipstick (Figure 9). DANGER Gasoline is extremely flammable and explosive. A fire or explosion from gasoline can burn you and others. • To prevent a static charge from igniting the gasoline, place the container and/or mower directly on the ground before filling, not in a vehicle or on an object.
Note: To raise the mower, move the front cutting height levers rearward and the rear cutting height levers forward. To lower the mower, move the front cutting height levers forward and the rear cutting height levers rearward. Figure 12 Note: If the mower does not start after several attempts, contact an Authorized Service Dealer. Using the Self-propel Drive Figure 10 1.
Stopping the Engine If the ignition switch on your mower (Figure 14) is a toggle switch (with both an “I” and a “Stop”), push the switch to the Stop position. Otherwise, hold down the switch in the Stop position until the engine stops. Figure 17 Disengaging the Blade Release the blade control bar (Figure 18). Figure 14 1. Ignition toggle switch Engaging the Blade When you start your engine, the blade does not turn. You must engage the blade to mow. Figure 18 1.
Bagging the Clippings Note: If the bag does not immediately deflate, the blade is still rotating. The blade brake clutch may be deteriorating and, if ignored, could result in an unsafe operating condition. Have the mower inspected and serviced by an Authorized Service Dealer. Use the grass bag when you want to collect grass and leaf clippings from the lawn. WARNING 5. Stop the engine and wait for all moving parts to stop.
Installing the Grass Bag Operating the Bag-on-Demand Lever 1. Raise and hold up the rear deflector (Figure 19). The bag-on-demand feature allows you to either collect or recycle grass and leaf clippings while the grass bag is attached to the mower. • For bagging the grass and leaf clippings, press the button on the bag-on-demand lever and move the lever forward until the button on the lever pops up (Figure 20). Figure 20 1.
Figure 21 1. Bag-on-demand door 2. Bag-on-demand door (open; in bagging position) (closed; in recycling or side-discharging position) Side-discharging the Clippings Use the side discharge for cutting very tall grass. If the grass bag is on the mower and the bag-on-demand lever is in the bagging position, move the lever to the recycling position (refer to Operating the Bag-on-Demand Lever). WARNING The blade is sharp; contacting the blade can result in serious personal injury.
Cutting Leaves • Avoid striking solid objects with the blade. Never deliberately mow over any object. • After cutting the lawn, ensure that half of the lawn shows through the cut leaf cover. You may need to make more than one pass over the leaves. • If the mower strikes an object or starts to vibrate, immediately stop the engine, disconnect the wire from the spark plug, and examine the mower for damage.
Maintenance Note: Determine the left and right sides of the machine from the normal operating position. Recommended Maintenance Schedule(s) Maintenance Service Interval Maintenance Procedure After the first 5 hours • Change the engine oil. Before each use or daily • • • • Check the engine oil level. Ensure that the engine stops within 3 seconds after releasing the blade control bar. Check the blade brake clutch operation. Clean grass clippings and dirt from under the mower.
2. Replace the air filter (Figure 25). Figure 27 Figure 25 Changing the Engine Oil 4. Slowly pour oil into the oil fill tube until the oil level reaches the Full line on the dipstick (Figure 26). Do not overfill. (Max. fill: 20 oz. (0.59 l), type: SAE 30 detergent oil with an API service classification of SF, SG, SH, SJ, SL, or higher.) Service Interval: After the first 5 hours 5. Install the dipstick securely. 3. Install the cover. Yearly 6.
Figure 29 This figure is simplified for the purpose of clarity. Figure 30 1. Blade nuts 4. 5. 6. 7. 3. Tighten the nut on the cable support. Replacing the Blade Service Interval: Yearly—Replace the blade or have it sharpened (more frequently if the edge dulls quickly). 2. Stiffener Remove the blade (Figure 30). Install the new blade (Figure 30). Install the stiffener you previously removed. Install the blade nuts and torque them to 15 to 27 ft-lb (20 to 37 N-m).
6. Remove the blade brake clutch shield (Figure 31). 7. Brush or blow out debris from the inside of the shield and around all the parts. 8. Install the blade brake clutch shield that you previously removed. 9. Install the blade driver and disk that you previously removed. 10. Install the blade and the stiffener that you previously removed (Figure 31). 11. Install the blade nuts and torque them to 15 to 27 ft-lb (20 to 37 N-m). 5. Turn the water on. 6.
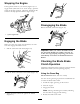
Storage 1. Remove the ignition key (electric-start models only). 2. Loosen the handle knobs until you can move the upper handle freely. Store the mower in a cool, clean, dry place. 3. Fold the upper handle forward as shown in Figure 33. Preparing the Mower for Storage Important: Route the cables to the outside of the handle knobs as you fold the handle. WARNING Gasoline vapors can explode. • Do not store gasoline more than 30 days. • Do not store the mower in an enclosure near an open flame.
Notes: 19
The Toro Total Coverage Guarantee A 2-Year Full Warranty (45 Day Limited Warranty for Commercial Use) The Toro GTS Starting Guarantee 22 in Recycler® 20 in Mulcher/Bagger Walk Power Mowers A 3-Year Full Warranty (Not Applicable for Commercial Use) Conditions and Products Covered Items and Conditions Not Covered The Toro Company and its affiliate, Toro Warranty Company, pursuant to an agreement between them, jointly promise to repair the Toro Product listed below if used for residential purposes*; if i
Form No. 3364-586 Rev A Cortacésped Recycler® 22 pulgadas Nº de modelo 20333—Nº de serie 310000001 y superiores Nº de modelo 20333C—Nº de serie 310000001 y superiores Manual del operador Puede adquirir piezas de repuesto en un Servicio Técnico Autorizado o en www.shoptoro.com. Introducción Nº de modelo Este cortacésped dirigido de cuchillas rotativas está diseñado para ser usado por usuarios domésticos. Está diseñado principalmente para segar césped bien mantenido en zonas verdes residenciales.
Emission Control Regulation of emission systems, maintenance, and warranty. Replacements may be ordered through the engine manufacturer. • Asegúrese de que no haya otras personas en la zona antes de usar la máquina. Pare la máquina si alguien entra en la zona. En los casos en que se indica la potencia en cv del motor, la potencia bruta del motor fue calculada en el laboratorio por el fabricante del motor, con arreglo a lo estipulado en SAE J1940.
especial. Si usted no se siente con confianza en una pendiente, no la siegue. • Siegue de través las cuestas y pendientes, nunca hacia arriba o hacia abajo. Extreme las precauciones al cambiar de dirección en cuestas o pendientes. • Esté alerta a agujeros, surcos, montículos, rocas u otros objetos ocultos. Los terrenos desiguales pueden causar caídas y resbalones. La hierba alta puede ocultar obstáculos. • No siegue la hierba mojada o en pendientes excesivamente empinadas.
• Compruebe frecuentemente los componentes del recogedor y el protector de descarga y sustitúyalos por piezas recomendadas por el fabricante cuando sea necesario. • No cambie los ajustes del regulador del motor ni haga funcionar el motor a una velocidad excesiva. • Revise o sustituya las pegatinas de seguridad e instrucciones cuando sea necesario. • Las cuchillas del cortacésped están muy afiladas. Envuelva la cuchilla o lleve guantes, y extreme las precauciones al manejar las cuchillas.
Montaje 1. Retire los pomos del manillar de la carcasa del cortacésped (Figura 4). Importante: Retire y deseche la hoja protectora de plástico que cubre el motor. Importante: Asegúrese de que los cables quedan por fuera de los pomos del manillar al instalar el manillar. 1 Instalación de la barra de control de la cuchilla No se necesitan piezas Procedimiento Instale la barra de control de la cuchilla en el manillar superior (Figura 3). Figura 4 2. Mueva el manillar a la posición de operación. 3.
El producto Figura 5 1. Varilla Figura 6 2. Vierta lentamente aceite en el tubo de llenado hasta que el nivel llegue a la marca "Full" (lleno) de la varilla (Figura 5). No llene demasiado. (Capacidad máxima: 0,59 l (20 onzas), tipo: SAE 30, aceite detergente con clasificación de servicio API SF, SG, SH, SJ, SL o superior.) 1. Agarradero 2. Barra de control de la cuchilla 3. Llave de contacto 4. 3. Vuelva a colocar la varilla firmemente. 5.
Operación Cómo llenar el depósito de combustible PELIGRO La gasolina es altamente inflamable y explosiva. Un incendio o una explosión provocado(a) por la gasolina puede causarle quemaduras a usted y a otras personas. • Para evitar que una carga estática incendie la gasolina, coloque el recipiente y/o el cortacésped directamente sobre el suelo antes de repostar, no en un vehículo o sobre otro objeto. Figura 8 • Llene el depósito en el exterior cuando el motor esté frío. Limpie cualquier derrame.
(44 mm); 2-1/8 pulgadas (54 mm); 2-1/2 pulgadas (64 mm); 2-7/8 pulgadas (73 mm); 3-1/4 pulgadas (83 mm); 3-5/8 pulgadas (92 mm); y 4 pulgadas (102 mm). aceite detergente con clasificación de servicio API SF, SG, SH, SJ, SL o superior.) 3. Vuelva a colocar la varilla firmemente. Ajuste de la altura de corte Cómo arrancar el motor ADVERTENCIA 1. Si el interruptor de encendido de su cortacésped (Figura 11) es un interruptor basculante (con “I” y “Stop”), ponga el interruptor en la posición (“I”).
Uso de la transmisión autopropulsada Para activar el sistema de autopropulsión, simplemente camine con las manos sobre el manillar superior y los codos junto al cuerpo, y el cortacésped mantendrá automáticamente su misma velocidad (Figura 13). Figura 14 1. Interruptor de encendido Cómo engranar la cuchilla Cuando usted arranca el motor, la cuchilla no gira. Es necesario engranar la cuchilla para segar. Figura 13 1. Tire hacia atrás del mecanismo de bloqueo de la barra de control (Figura 15).
Nota: La bolsa debe empezar a inflarse, lo que indica que la cuchilla está engranada y girando. 4. Suelte la barra de control de la cuchilla. Nota: Si la bolsa no se desinfla inmediatamente, es que la cuchilla sigue girando. El embrague del freno de la cuchilla puede estar deteriorándose, y si esto se ignora, podría dar lugar a un estado de operación inseguro. Haga revisar y reparar el cortacésped por un Servicio Técnico Autorizado. Figura 17 5.
de ensacado, mueva la palanca a la posición de reciclado (consulte Manejo de la palanca de ensacado a demanda) antes de reciclar los recortes. Si el conducto de descarga lateral está instalado en el cortacésped, retírelo (consulte Cómo retirar el conducto de descarga lateral) antes de reciclar los recortes. Ensacado de los recortes Utilice la bolsa de recortes si usted desea recoger los recortes de hierba y hojas del césped.
Funcionamiento de la palanca de ensacado a demanda La función de ensacado a demanda le permite recoger o reciclar los recortes de hierba y hojas con la bolsa de recortes instalada en el cortacésped. • Para ensacar los recortes de hierba y hojas, presione hacia dentro el botón de la palanca de ensacado a demanda y mueva la palanca hacia delante hasta que salga el botón de la palanca (Figura 20). Figura 21 1. Tapa de ensacado a demanda (abierta; en la posición de ensacado) 2.
Consejos de operación Consejos generales de siega • Despeje la zona de palos, piedras, alambres, ramas y otros residuos que podrían ser golpeados por la cuchilla. • Evite golpear objetos sólidos con la cuchilla. No siegue nunca por encima de objeto alguno. • Si el cortacésped golpea un objeto o empieza a vibrar, pare inmediatamente el motor, desconecte el cable de la bujía e inspeccione el cortacésped en busca de daños.
Cómo cortar hojas – – – – – Cambiar la cuchilla o mandarla a afilar. Caminar más despacio mientras siega. Elevar la altura de corte del cortacésped. Cortar el césped con más frecuencia. Solapar los pasillos de corte en lugar de cortar un pasillo completo en cada pasada. – Ajustar la altura de corte una muesca menos en las ruedas delanteras que en las traseras. Por ejemplo, ajuste las ruedas delanteras a 54 mm (2-1/8 pulg.) y las traseras a 64 mm (2-1/2 pulg.).
Figura 25 3. Coloque la tapa. Figura 23 Cómo cambiar el aceite del motor 3. Después de realizar el/los procedimiento(s) de mantenimiento, conecte el cable de la bujía a la bujía. Importante: Antes de inclinar el cortacésped para cambiar el aceite o sustituir la cuchilla, deje que se vacíe el depósito de combustible con el uso normal. Si es imprescindible inclinar el cortacésped antes de que se acabe el combustible, utilice una bomba manual para retirar el combustible.
Figura 27 Figura 29 La figura está simplificada en aras de mayor claridad. 4. Vierta lentamente aceite en el tubo de llenado hasta que el nivel llegue a la marca "Full" (lleno) de la varilla (Figura 26). No llene demasiado. (Capacidad máxima: 0,59 l (20 onzas), tipo: SAE 30, aceite detergente con clasificación de servicio API SF, SG, SH, SJ, SL o superior.) 3. Apriete la tuerca del soporte del cable. 5. Vuelva a colocar la varilla firmemente. Cómo cambiar la cuchilla 6.
Figura 30 1. Tuercas de la cuchilla Figura 31 2. Refuerzo 1. Tuercas de la cuchilla 2. Refuerzo 3. Cuchilla 4. Retire la cuchilla (Figura 30). 4. Impulsor de la cuchilla 5. Disco 6. Protector del embrague del freno de la cuchilla 5. Instale la cuchilla nueva (Figura 30). 4. Retire la cuchilla (Figura 31). 6. Instale el refuerzo que retiró anteriormente. 5. Retire el impulsor de la cuchilla y el disco (Figura 31). 7. Instale las tuercas de la cuchilla y apriételas a 20–37 Nm (15–27 pies-libra). 6.
1. Baje el cortacésped a la altura de corte más baja. Consulte Ajuste de la altura de corte. Almacenamiento 2. Lleve el cortacésped a una superficie plana pavimentada. Almacene el cortacésped en un lugar fresco, limpio y seco. 3. Lave la zona que está debajo del deflector trasero por donde pasan los recortes en su camino desde la carcasa hasta la bolsa de recortes.
Cómo plegar el manillar ADVERTENCIA Si pliega o despliega el manillar de forma incorrecta, pueden dañarse los cables, creando unas condiciones de operación inseguras. • No dañe los cables al plegar o desplegar el manillar. • Si un cable está dañado, póngase en contacto con el Servicio Técnico Autorizado. 1. Retire la llave de contacto (modelos de arranque eléctrico solamente). 2. Afloje los pomos del manillar hasta que pueda mover libremente la sección superior del mismo. 3.
La Garantía Toro de Cobertura Total Garantía de Arranque GTS de Toro Una garantía completa de 2 años (Garantía limitada de 45 días para el uso comercial) Una garantía completa de 3 años (no aplicable al uso comercial) Recycler® de 22 pulgadas Picador/ensacador de 20 pulgadas Cortacéspedes dirigidos Condiciones y productos cubiertos Elementos y condiciones no cubiertos The Toro Company y su afiliado, Toro Warranty Company, bajo un acuerdo entre sí, prometen conjuntamente reparar el producto Toro nombrad
Form No. 3364-586 Rev A Tondeuse Recycler® 22 pouces N° de modèle 20333—N° de série 310000001 et suivants N° de modèle 20333C—N° de série 310000001 et suivants Manuel de l'utilisateur Vous pouvez vous procurer des pièces de rechange chez n'importe quel dépositaire agréé ou sur le site www.shoptoro.com. Introduction N° de modèle Cette tondeuse à conducteur marchant à lame rotative est destinée au grand public.
• Vérifiez que personne ne se trouve dans la zone de travail avant d'utiliser la machine. Arrêtez la machine si quelqu'un entre dans la zone de travail. • N'utilisez pas la machine pieds nus ou chaussé de sandales. Portez toujours des chaussures solides. • Ne tirez jamais la machine en arrière, sauf en cas d'absolue nécessité. Vérifiez toujours si la voie est libre juste derrière la machine et sur sa trajectoire avant de reculer. • Ne dirigez jamais l'éjection vers qui que ce soit.
• Travaillez transversalement à la pente, jamais vers le haut ou vers le bas. Soyez extrêmement prudent lorsque vous changez de direction sur un terrain en pente. • Méfiez-vous des trous, ornières, bosses, rochers ou autres obstacles cachés. Les irrégularités de terrain peuvent vous faire déraper et provoquer votre chute. L'herbe haute peut masquer les accidents du terrain. • Ne tondez pas quand l'herbe est humide ni sur des pentes raides. Vous pourriez glisser et vous blesser en tombant.
• Les lames du tablier de coupe sont tranchantes. Vous ne devez les toucher qu'avec des gants ou enveloppées dans un chiffon, et toujours avec la plus grande précaution. • Ne modifiez pas le réglage du régulateur et ne faites pas tourner le moteur à un régime excessif. • Remplacez les autocollants d'instruction ou de sécurité manquants ou endommagés, selon les besoins.
Mise en service 1. Retirez les boutons du guidon sur le carter de la tondeuse (Figure 4). Important: Retirez et mettez au rebut la pellicule de plastique qui protège le moteur. Important: Faites passer les câbles à l'extérieur des boutons pendant que vous montez le guidon. 1 Montage de la barre de commande de la lame Aucune pièce requise Procédure Montez la barre de commande de la lame sur la partie supérieure du guidon (Figure 3). Figure 4 2. Placez le guidon en position d'utilisation. 3.
Vue d'ensemble du produit Figure 5 1. Jauge d'huile 2. Versez de l'huile lentement dans le goulot de remplissage pour faire monter le niveau de liquide jusqu'au repère du plein (Full) sur la jauge (Figure 5). Ne remplissez pas excessivement. (Remplissage max. : 0,59 l (20 oz), type : huile détergente SAE 30 de classe de service API SF, SG, SH, SJ, SL ou supérieure.) Figure 6 1. Guidon 8. Levier de hauteur de coupe (4) 9. Filtre à air 2. Barre de commande de la lame 3. Commutateur d'allumage 10.
Utilisation Remplissage du réservoir de carburant DANGER L'essence est extrêmement inflammable et explosive. Un incendie ou une explosion causé(e) par l'essence peut vous brûler, ainsi que les personnes se tenant à proximité. • Pour éviter que l'électricité statique n'enflamme l'essence, posez le récipient et/ou la tondeuse directement sur le sol, pas dans un véhicule ou sur un support quelconque, avant de faire le plein. Figure 8 • Remplissez le réservoir de carburant quand le moteur est froid.
Remarque: Le tablier de coupe peut être réglé aux hauteurs suivantes : 25 mm (1"), 35 mm (1-3/8"), 44 mm (1-3/4"), 54 mm (2-1/8"), 64 mm (2-1/2"), 73 mm (2-7/8"), 83 mm (3-1/4"), 92 mm (3-5/8") et 102 mm (4"). détergente SAE 30 de classe de service API SF, SG, SH, SJ, SL ou supérieure.) 3. Revissez la jauge fermement en place. Réglage de la hauteur de coupe Démarrage du moteur 1.
Utilisation de la commande d'autotraction Débrayage de la lame La lame ne tourne pas automatiquement quand le moteur démarre. Il faut engager la lame pour tondre. Pour actionner l'autotraction, il vous suffit d'avancer, les mains posées sur la partie supérieure du guidon et les coudes serrés ; la tondeuse avance automatiquement à votre rythme (Figure 13). 1. Tirez le verrou de la barre de commande en arrière (Figure 15). Figure 15 Figure 13 2.
Débrayage de la lame Utilisation sans le bac à herbe Relâchez la barre de commande de la lame (Figure 18). 1. Amenez la tondeuse sur une surface revêtue à l'abri du vent. 2. Réglez les 4 roues à la hauteur de coupe de 83 mm (3-1/4"). 3. Roulez en boule une demi-feuille de papier journal (environ 7,6 cm ou 3 pouces de diamètre) et placez-la sous le tablier de coupe. 4. Placez la boule de papier journal à 13 cm (5 pouces) devant la tondeuse. Figure 18 5. Mettez le moteur en marche. 6. Engagez la lame.
Ramassage de l'herbe coupée Utilisez le bac à herbe pour recueillir l'herbe et les feuilles coupées à la surface de la pelouse. ATTENTION Si le bac à herbe est usé, des gravillons ou autres débris similaires risquent d'être projetés vers l'utilisateur ou des personnes à proximité, et de causer des blessures graves ou mortelles. Examinez fréquemment le bac. S'il est endommagé, remplacez-le par un bac Toro neuf d'origine.
• Pour ramasser les déchets d'herbe et de feuilles, appuyez sur le bouton du levier de ramassage sur demande et déplacez le levier complètement en avant jusqu'à ce que le bouton ressorte (Figure 20). Figure 21 1. Volet de ramassage sur 2. Volet de ramassage sur demande (ouvert , position demande (fermé ; position de ramassage) de recyclage ou d'éjection latérale) Figure 20 1.
• Évitez de heurter des obstacles avec la lame. Ne passez jamais intentionnellement sur un objet quel qu'il soit. • Si la tondeuse a heurté un obstacle ou commence à vibrer, coupez immédiatement le moteur, débranchez la bougie et vérifiez si la tondeuse n'est pas endommagée. • Pour de meilleurs résultats, montez une lame neuve au début de la saison de tonte. • Remplacez la lame dès que nécessaire par une lame Toro d'origine. La tonte • Ne tondez l'herbe que sur 1/3 de sa hauteur à chaque fois.
– Réglez la hauteur de coupe des roues avant un cran en dessous de celle des roues arrière. Par exemple, réglez les roues avant à 54 mm (2-1/8") et les roues arrière à 64 mm (2-1/2"). vous devrez peut-être repasser plusieurs fois sur les feuilles. • Si la couche de feuilles fait plus de 13 cm (5") d'épaisseur, réglez les roues avant un ou deux crans plus haut que les roues arrière. Hachage de feuilles • Ralentissez la vitesse de déplacement si les feuilles ne sont pas hachées assez menues.
Vidange et remplacement de l'huile moteur Important: Avant de basculer la tondeuse pour vidanger l'huile ou remplacer la lame, laissez le moteur en marche jusqu'à ce qu'il s'arrête faute de carburant. Si vous ne pouvez pas attendre que le moteur s'arrête par manque de carburant, utilisez une pompe manuelle pour vider le reste de carburant. Basculez toujours la tondeuse sur le côté (filtre à air en haut).
5. Revissez la jauge fermement en place. Remplacement de la lame 6. Débarrassez-vous correctement de l'huile usagée en la déposant dans un centre de recyclage agréé. Périodicité des entretiens: Une fois par an—Remplacez la lame ou faites-la aiguiser (plus souvent si elle s'émousse rapidement). Réglage du câble de commande d'autotraction Important: Vous aurez besoin d'une clé dynamométrique pour monter la lame correctement.
Nettoyage de la protection du débrayage de frein de lame Nettoyage de la tondeuse Périodicité des entretiens: À chaque utilisation ou une fois par jour Périodicité des entretiens: Toutes les 25 heures ATTENTION Nettoyez la protection su débrayage du frein de lame une fois par an pour empêcher la lame de caler en cours de tonte. De l'herbe peut être projetée de sous la tondeuse. • Portez une protection oculaire. • Restez à la position de conduite (derrière le guidon) quand le moteur est en marche.
Remisage Pliage du guidon ATTENTION Remisez la tondeuse dans un local frais, propre et sec. Vous risquez d'endommager les câbles et de rendre la machine dangereuse à utiliser si vous pliez ou dépliez mal le guidon. Préparation de la tondeuse au remisage • Veillez à ne pas endommager les câbles en pliant ou dépliant le guidon. ATTENTION • Si un câble est endommagé, adressez-vous à un réparateur agréé. Les vapeurs d'essence sont explosives. • Ne conservez pas l'essence plus d'un mois.
Remarques: 19
La garantie intégrale Toro Garantie de démarrage GTS Toro Une garantie intégrale de 2 ans (garantie limitée de 45 jours pour usage commercial) Une garantie intégrale de 3 ans (ne s’applique pas à l’usage commercial) Recycler® 22 pouces Déchiqueteuse/dispositif de ramassage de 20 pouces Tondeuses autotractées Conditions et produits couverts Ce que la garantie ne couvre pas The Toro Company et sa filiale Toro Warranty Company, en vertu d'un accord mutuel, s'engagent conjointement à réparer les produits T