
Service Manual


4.
Use extreme care with mechanical cleaning devices:
i.e. wires, probes, tip cleaners, etc. Mechanical clean-
ing may damage or enlarge critically sized carburetor
components and passages.
Carburetor
-
Assembly
1,
Install a new welch plug in the pilot circuit opening on
the body of the carburetor. Use a
1/8”
(3
mm) pin
punch to dimple and seal the welch plug
in
the body of
the carburetor.
2.
Install the throttle shaft dust seal and throttle shaft in
the body of the carburetor.
3.
Use red, number
271
Loctite
(R)
on the throttle plate
screw and install the throttle plate. Allow the specified
amount of time for the Loctite to cure before operating
the engine.
4.
Place
a
dust seal on the choke shaft and insert the
choke shaft in the body of the carburetor.
5.
While looking at the choke end of the carburetor,
position the choke shaft with the over-center spring
slot toward the right side
of
the carburetor.
6.
Insert the choke plate
so
the plate is captured in the
slot of the choke shaft. The choke should fully close
with a
90
degree clockwise turn of the shaft.
7.
Install the idle stop screw. Adjustment of the screw
should be performed when the engine is running. Idle
speed should beset to
1700
RPM. See page
16
for the
carburetor adjustment procedure.
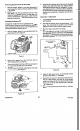
8.
Install the idle mixture screw; nominally set at
1
to
1-1/2 turns open. See Figure
20.
IDLE
MIXTURE
SCREW
9.
Install a new viton seat. Insert the seat with a
1/8"
(3
mm) pin punch. The flat end of the inlet needlewill also
work to push the seat
in
place. Take care not to
damage the point end of the needle.
10.
Install the needle on the float. Put the float and needle
in
position and insert the hinge pin.
1I.
Install the float stop disc and
the
main jet.
12.
Install the bowl gasket and the
fuel
bowl.
13.
Install the bowl nut.
Carburetor -Adjustment
See “Carburetor
-
Adjustment"
in
the Maintenance Section
on page
16.
Carburetor
22
GTS
150