
Operator's Manual


Important:Iftheoillevelinthecrankcaseistoo
lowortoohighandyouruntheengine,youmay
damagetheengine.
13.Installthedipsticksecurely.
14.Recycletheusedoilproperly.
ChargingtheBattery
ServiceInterval:Every25hours
Yearlyorbeforestorage
Electric-startmodelonly
WARNING
Batteryposts,terminals,andrelatedaccessories
containleadandleadcompounds,chemicals
knowntotheStateofCaliforniatocausecancerand
reproductiveharm.
W ash y our hands after handling
the batter y .
Chargethebatteryfor24hoursinitially,thenmonthly(every
25starts)orasneeded.Alwaysusethechargerinasheltered
area,andchargethebatteryatroomtemperature(about22°
C,or70°F)wheneverpossible.
Note:Themachineisequippedwithanalternatorcharging
system.
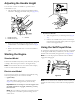
1.Connectthechargertothewireharness,whichis
locatedbelowtheignitionkey(Figure35).
G017518
Figure35
2.Plugthechargerintoawalloutlet.
Note:Yourbatterychargermayhavea2-colorLED
displaythatindicatesthefollowingstatesofcharging:
•Aredlightindicatesthatthechargerischarging
thebattery.
•Agreenlightindicatesthatthechargerisfully
chargedorisdisconnectedfromthebattery.
•Aashinglightthatalternatesbetweenredand
greenindicatesthatthebatteryisnearlyfully
charged.Thisstatelastsonlyafewminutesuntil
thebatteryisfullycharged.
Note:Whenthebatterynolongerholdsacharge,
recyclethelead-acidbatteryaccordingtolocalcodes.
ReplacingtheFuse
Electric-startmodelonly
Ifthebatterydoesnotchargeortheenginedoesnotturn
withtheelectricstarter,thefusemaybeblown;replaceitwith
a40-ampplug-intypefuse.
Important:Youcannotstartthemachinewiththe
electricstarterorchargethebatteryunlessaworking
fuseisinstalled.
1.Openthesealedfuseholderandreplacethefuse
(Figure36).
G020856
1
Figure36
1.Fuseholder
2.Closethecovertothefuseholder,andensurethatit
issealedtightly.
ReplacingtheBattery
Electric-startmodelonly
RemovingtheOldBattery
1.ContactanAuthorizedToroPartsDealertoobtaina
replacementbattery.
2.Removethebeltcover;refertostep1ofServicingthe
Blade-driveSystem(page20).
3.Removetherear-dischargeplug.
4.Movethehandletotheverticalposition.
5.Removethe4smallboltsthatholdtherear-deector
andhandle-lockleverassemblyinplace.
6.Foldthehandleallthewayforward.
7.Removetherear-deectorandhandle-locklever
assembly(Figure36).
18