
Operator's Manual


14
270
1
1
2
3
4
A
B
C
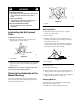
Figure
22
1. Sail
2. Flat
part of blade
3. Wear
4.
Slot formed
DANGER
POTENTIAL
HAZARD
•
A worn or damaged blade could br
eak and a
piece of the blade could be thr
own into
operator’
s or bystander
’
s ar
ea.
WHA
T CAN HAPPEN
•
A thr
own piece of the blade could cause serious
personal injury or death to the operator or
bystanders.
HOW T
O A
V
OID THE HAZARD
•
Inspect the blade periodically for wear or
damage.
•
Replace a worn or damaged blade.
Removing the Blade
1. Grasp
the end of the blade using a rag or thickly
padded glove.
2.
Remove the blade bolt, lockwasher
, blade accelerator
and blade (Fig. 23).
1627
1
2
3
4
5
Figure
23
1. Blade
bolt
2.
Lock washer
3. Accelerator
4. Blade
5.
Blade driver
Sharpening the Blade
Using
a file, sharpen top side of the blade and maintain
the original cutting angle (Fig. 24).
153
1
Figure
24
1. Sharpen
at this angle only
Note:
The blade will remain balanced if same amount of
material is removed from both cutting edges.
Balancing the Blade
1. Check
the balance of the blade by placing the center
hole of the blade over a nail or screwdriver shank
clamped horizontally in a vise (Fig. 25).
Note:
Y
ou can also check the balance using a
commercially manufactured, blade balancer
.
1007
Figure
25
2. If
either end of the blade rotates downward, file that
end (not the cutting edge or the end near the cutting
edge). The blade is properly balanced when neither
end drops.
Installing the Blade
1. Position
the blade onto the spindle and blade driver
,
with the curved blade tips pointing toward the mower
and the blade driver nesting in the recess of the blade
(Fig. 23).
2.
Install the accelerator
, lock washer
, and blade bolt
(Fig. 23).
3. T
ighten the blade bolt to 50 ft-lb (68 N
m).