
Installation Instructions


4
DisconnectingtheOptional
Attachments
NoPartsRequired
DisconnectingtheOptionalEductorKit
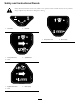
1.Removetheangeclampthatsecurestheanged
hose-barbofthesupplyhosetotheinletangeofthe
eductor(Figure9).
Figure9
1.Inletange(eductor)
3.Flangeclamp
2.Gasket
4.Flanged-hose-barb
(supplyhose)
2.Removetheangedhosebarbandgasketfromthe
eductor(Figure9).
Note:Retaintheangeclampandgasketfor
installationin18InstallingtheSupplyHoseforthe
OptionalEductorKit(page47).Younolongerneed
thesupplyhoseandyouwillremoveitwiththe
agitation,rate,andmastersprayvalvesin7Removing
theAgitation,Rate,andMaster-SprayValves(page14).
3.Removetheretainerthatsecuresthe90°barbedtting
ofthesprayersupplyhosetotheT-ttinglocated
forwardofthepressure-reliefvalve(Figure11).
Note:RetaintheretainersforinstallationinInstalling
theSprayerSupplyHose—Machinewithoutthe
OptionalEductorKit(page34).
Figure10
Figure11
1.Retainer
5.Sprayersupplyhose
2.90°barbedtting(sprayer
supplyhose)
6.Pressure-reliefvalve
3.Frontofthemachine
7.3-wayvalve
4.T-tting
4.Removethe90°barbedttingfromtheT-tting
(Figure11).
9