
Installation Instructions


G010637
1
2
2
3
4
5
6
7
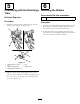
Figure7
1.Deectorassembly5.Locknut(existing)
2.Fasteners(existing),retain
6.Forwardhole
3.Carriagebolt(existing)
7.Frontretainingclasp
4.Cutoffbafe(existing)
2.Removethedeectorassemblyandreinstallthecut
offbafe.Retainallpartstoconvertthedeckto
sidedischarge.
3.Installabafetodeck(Figure8).For48inch
decks,useastraightbafe.For54inchdecks,
useacurvedbafe.Aligntheverticalpostinthe
bafewithforwardholeinthedeck.Rotatethe
bafeuntilthehorizontalpostalignswiththehole
inthefrontwallofthedeck.Secureittothefront
wallofthedeckusingalocknut.
1
2
3
4
5
6
7
G015685
Figure8
1.Retainingclasp5.Horizontalpost
2.Forwardhole6.Locknut
3.Bafe
7.Frontwallhole
4.Verticalpost
4.Installthechutetothedeckmakingsuretheopening
intopofthechutealignswiththeexposedposton
thedecktop(Figure9).
G010638
1
2
3
4
5
6
Figure9
1.Dischargechute
4.Postincurvedbafe,
forwardhole
2.Handknob
5.Frontexiblelatch
3.Washer
6.Openinginthetopofthe
chute
5.Installawasherandhandknoboverthepostcoming
throughthechutetop.Handtightentosecurethe
chutetothedeck.
6.Hookthefrontexiblelatchonthechutetothe
retainingclaspweldedtothefrontwallofthedeck
(
Figure10).Hooktheexiblelatchonthebackof
thechutetotheretainingclaspweldedtotherear
wallofthedeck.
Figure10
1.Flexiblelatchandretainingclasp
5