
Installation Instructions


Installation Instructions
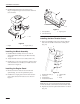
6
2.
Install and tighten the three new engine screws
(Fig. 8). T
orque the engine screws to 250 to 400 in-lb
(28 to 45 N
Sm).
m-4679
2
1
Figure
8
1. Engine 2. Engine
screw (3)
Installing the Blade Assembly
1. Install
the blade assembly in the reverse order of
disassembly
. Refer to
Removing the Blade Assembly
on page 4.
2. T
orque the blade nuts to 15 to 27 ft-lb (20-37 N
m).
3.
Install a 5/16—0.75 screw and 5/16-in. washer in place
of the discarded screw and tab (see “Install screw and
washer here” in Figure 5).
Installing the Engine Guard
1. Remove
the four hex head screws from the front
quadrants (Fig. 9). Leave the quadrants in place.
2.
Install the new engine guard on the front of the lawn
mower deck with two hex head screws as shown in
Figure 9.
m-4678
1
2
3
Figure
9
1. Front
quadrants
2.
Hex head screw (4)
3.
Engine guard
Installing the New Throttle Control
1. Remove
four Phillips head screws and four locknuts
that secure the throttle control to the control panel
(Fig. 10).
1
2
3
4
5
6
7
Figure
10
1. Phillips
head screw (4)
2.
Locknut (4)
3.
Throttle control
4.
Throttle control retainer
5.
Throttle cable
6. Seal
7. Decal
Note:
Keep the screws and locknuts. Discard the throttle
control, the throttle control retainer
, and the throttle cable.
2.
Replace the old control panel decal with the new decal
(Fig. 10).