
Service Manual


Brake Cylinder Service
Disassembly
1. Disassemble brakes as described in Brake Service.
2. Disconnect brake line from brake cylinder. Put a cap
on brake line to prevent contamination of system and
brake fluid leakage.
3. Remove two (2) capscrews and lockwashers secur-
ing brake cylinder to backing plate (Fig. 12). Remove
brake cylinder assembly
.
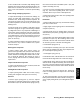
4. Remove dust covers (Fig. 11, Item 1), pistons (Item
2
), seals (Item 3) and spring (Item 4). Discard dust cov-
ers and seals.
Inspection
1. Clean all metal parts with isopropyl alcohol, then
clean out and dry grooves and passageways with com-
pressed air
. Make sure cylinder bore and component
pieces are thoroughly clean.
2. Check cylinder bore and pistons and spring for dam-
age or excessive wear
. Replace brake cylinder assem-
bly if signs of pitting, scoring or cracks are evident.
Assembly
1. Apply a film of clean brake fluid to new piston seals
(Item 3), then install onto pistons (Item 2).
2. Apply a film of clean brake fluid to cylinder bore and
piston assemblies. Carefully install one piston, the
spring (Item 4), then the other piston.
3. Install new dust covers (Item 1).
4. Install brake cylinder assembly to backing plate with
two (2) capscrews and lockwashers.
5. Connect brake line to brake cylinder.
6. Reassemble brakes as described in Brake Service.
7. Bleed brakes.
5)
6)
7)
4)
3)
2)
1)
Figure 10
1. Dust cover 5. Bleed screw
2. Piston 6. Bleed screw cap
3. Seal 7. Body
4. Spring
Steering, Brakes and Suspension Page 7 – 14 Workman 3000 Series