
Service Manual


6. Install stub axle removal tool onto wheel studs.
7. Loosen flange lock (Item 4) nut by turning counter-
clockwise.
8. Remove stub axle (Item 6).
9. To remove driveshaft, loosen locknuts (Item 9) , then
r
emove bolts securing driveshaft at splined axle shaft of
transaxle. Slide driveshaft outward and remove from
transaxle.
Installation
1. If driveshaft was removed, install drive shaft clamp
end onto splined axle shaft. T
ighten clamp bolts to a
torque of 47 – 57 Nm (35 – 42 ft–lb).
2. Inspect bearings and replace if necessary. If outer
bearing is removed from stub axle, bearing set must be
replaced. Bearings, with bearing cups and thin spacer
,
are a MATCHED SET. Use one set per housing. Parts
are NOT INTERCHANGEABLE.
3. Press bearing cups into housing.
4. Use a bearing packer tool to pack bearings with axle
bearing grease.
5. Press larger bearing (Item 7), wide end first, onto stub
axle, then slide thin spacer onto stub axle.
6. Insert stub axle (Item 6) with bearing and thin spacer
into housing.
7. Insert large spacer (Item 8), tapered end
outward – to-
ward threaded end of stub axle, onto shaft inside hous-
ing.
8. Insert smaller bearing (Item 11), small end first, onto
shaft inside housing.
9. Install new seal (Item 10) over shaft and into housing.
Be careful not to damage the seal.
10. Install drive shaft yoke onto stub axle shaft.
11. Apply Loctite 271 or equivalent to threads of stub
axle, then install washer (Item 5) and flange nut (Item 4).
12. Insert modified 1–1/8
box end wrench on stub axle
flange nut (Item 4).
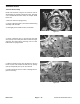
13. Use an additional stub axle as a tool. Install second
stub a
xle to wheel studs as shown. Install an extra flange
nut on second stub axle threads. Use a 1–1/8 six point
socket and torque wrench to tighten stub axle flange nut
to a torque of 300 – 340 Nm (220 – 250 ft–lb).
14. Install brake drum (Item 3) and wheel. Tighten wheel
nuts to a torque of 60
– 75 Nm (45 – 55 ft–lb).
Figure 21
Figure 22
Figure 23
Drive Train Page 6
– 14 Workman 3000/4000 Series