
Service Manual


Checking Starter Pinion Gap
1. Install 12 volt battery between the “S” terminal and
the starter body. The pinion should protrude and stop.
IMPORTANT: Never apply battery voltage to the
st
arter for longer than 10 seconds.
2. Lightly push the pinion back and measure the return
st
roke (called pinion gap).
3. If the pinion gap is not within standard range of 0.5 -
2.0 mm (0.02 - 0.08 in.), adjust it by increasing or
de
creasing the number of packings on the magnetic
switch. The gap is decreased as the number of packings
increases.
Figure 29
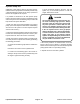
Starter No-Load Test
1. Connect a 12 volt battery, ammeter and voltmeter to
the starter as shown.
2. When terminals “
S” and “B” are connected the pinion
should protrude and the starter should run smoothly.
Terminal voltage: 11.5V
Current: 100 A
Speed: 3000 rpm
No-Load Test Results
Low speed and high current draw:
- High friction (faulty bearings, bent armature shaft).
- Shorted armature.
- Grounded armature or fields.
Fail
ure to operate with high current draw:
- Direct ground in terminals or fields.
- “Frozen” bea
rings.
High speed and high current draw:
- Poor contact between brushes and commutator
(b
roken brush springs, worn brushes, high insulation
between commutator bars).
- High internal resistance (poor connections, dam-
ag
ed leads, dirty commutator or open field circuit).
- Shorted fields.
Failure to operate with no current draw:
Figure 30
- Open field circuit.
Low speed and low current draw:
- Open armature coils - check commutator for badly
burned bars after disassembly.
Liquid Cooled Diesel Engine P
age 4 - 28 Workman 3300-D/4300-D